CR550HC Compact Power Rake

CR550HC Compact Power Rake
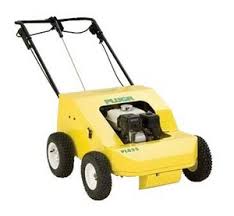
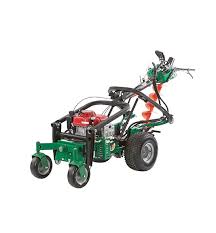
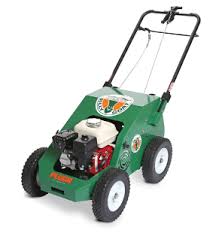
Removing excessive thatch can do a lot to improve your lawn, but doing it by hand is backbreaking and time-consuming. That’s why Billy Goat makes the CR550HC compact power rake. It may not have all the features of their commercial models, but its small size makes it a perfect alternative to manual raking. This makes it a great choice for homeowners and rental businesses alike.

Cutting Power

The CR550HC comes from the factory with a flail reel. As the reel spins, each free-swinging flail drags against the ground, pulling up thatch without damaging the grass or soil surface. The flail shaft rides on a pair of cast iron pillow block bearings with built-in grease zerks. These will last through years of use, and they are easy to replace once they finally wear out. A bail on the operator handle controls the flail clutch, making it easy to disengage when making turns.

Using the front-mounted knob, the blades can be set to a depth between ½ and ¾ inches. While competing rakes have incremental height settings, this rake allows infinite adjustment. This spreads wear across the flails instead of concentrating it at spots, increases flail life. A lever next to this knob lifts and lowers the blade assembly. This lets you lift the reel up to avoid scraping against the pavement, then drop back down to your original working height.

The optional vertislicing reel has fixed blades that cut thin trenches into soil. This opens up the surface for seeding. Both vertislicing blades and flails can be replaced individually, so broken sections can be fixed without rebuilding the entire reel. Users can expect to cover 13,200 square feet, or about 1/3 of an acre, per hour pushing the rake at 1.5 MPH.

Engine

The CR550 is powered by a Honda GC160. While it may not be as ubiquitous in commercial equipment as the GX series, it is a popular option for powering walk-behind mowers. Output is 5 HP. While classified as a residential engine, the GC-Series is still designed and built with Honda’s usual attention to usability and reliability.

The overhead cam head uses a belt drive designed to last the life of the engine. This belt picks up oil and splashes it onto the valvetrain, keeping everything lubricated without needing a pump. This oiling system, combined with the rake’s wide base, makes it possible to operate on slopes as steep as 20 degrees. This makes this rake a great choice for clearing thatch from hilly areas. The GC-Series is also the lightest engine of its type on the market, making the rake easier to roll.

Operator Comfort and Convenience

The base is constructed from a single piece of sheet steel. This works with the padded handle to dampen vibrations before they reach the operator. A pair of steel loops keep the folding handle in place during use. When you are ready to store this machine, just slide the loops up to fold down the handle.

The engine is mounted in a way that keeps it fully exposed, making it easy to work on. It sends power to the reel via a drive belt, which is accessible by removing two small covers on the side of the machine.

Warranty

Like most of their equipment, Billy Goat guarantees the CR550 for one year, whether it’s used by homeowners, commercial operators or rental businesses. Honda guarantees the engine for two years of residential use or three months of commercial or rental use.

Get the Parts You Need for Your Billy Goat

Billy Goat Parts has the parts for every model Billy Goat makes from the CR550 to the biggest truck loaders and debris blowers. Need engine parts? We carry those, too. Our site has sections for common replacement parts, while our search engine can show you part listings and diagrams specific to your model. Visit us at www.billygoatparts.com. We can ship your order to any address in the U.S. or Canada.

Posted in Uncategorized | Tagged , | Leave a comment

Maintaining PL855 and PL410 PLUGR Aerators

Maintaining PL855 and PL410 PLUGR AeratorsJust because your equipment is getting older doesn’t mean it’s bound for the scrap heap. While the original yellow PLUGR aerators were replaced by NextGen models years ago, there are still plenty of these in commercial service today. How can you keep yours running? Here’s what you need to know to perform common repairs on PL410 and PL855 aerators.

PL410 Belt and Bearing Replacement

Tools:
Phillips head screwdriver
½ inch and 9/16 open-end wrenches
Ratcheting wrench with ½, 7/16 and 9/16 sockets
Allen wrenches
High strength thread locker
Pry bar

1. Loosen the straps and the screw on the top cover. Tilt the cover forward and remove.
2. Unbolt and remove the front and back covers.
3. Remove the 8 bolts that hold the crankshaft to the side plates. This also loosens the retractor bracket.
4. Slide the drive belt off of the idler pulley, engine pulley, and crankshaft pulley in that order. Lift the crankshaft out of the machine.

At this point, you can replace the belt. Reassemble your PLUGR by following the previous steps in reverse order.

5. Loosen the set screws with an Allen wrench. Use the pry bar to push between the crankshaft counterweight and bearing plate to slide the bearing off of the crankshaft.
6. Remove the cartridge bearing from the plate using an Allen wrench and a regular wrench.
7. Reassemble in reverse order. Apply thread locker to the bearing set screw, and make sure the zerks point up for easy servicing. Use the longest bolts for the holes that go through the retractor plate. Leave these bolts loose enough to let the plate move.

PL855 Belt Replacement

Tools:
½ and 9/16 inch wrenches
A ratchet wrench with ½ and 9/16 inch sockets

Have someone on hand to help you lift the crankshaft. During reassembly, a set of needle nose pliers can help hold nuts in place while you’re getting them started.

1. Remove the rubber latches on the sides of the machine. Remove the top cover.
2. Slide the front cover forward and remove it.
3. Remove the tensioner bracket on the top right of the machine.
4. Remove the four bolts holding the engine onto the base.
5. Loosen the self-tightener for the transaxle belt. This is the spring and bolt on the front of the machine.
6. Slide the engine to the side. Slide the belts off of the drive pulleys.

You can now remove the transaxle belt. If it’s the only belt that needs replacement, follow the previous steps in reverse order to put your PLUGR back together. Bolt down the engine before sliding the belt over all the pulleys. You may need to slide the idler pulley out, then over the belt to get the belt around the pulleys.

7. Remove the pin from the retractor rod.
8. Remove the 4 bolts that hold the crankshaft onto the sides of the machine. Leave one bolt in place until you’re ready to lift out the crankshaft.
9. With the crankshaft free, you can replace the belts. Reassemble the machine by following the previous steps in reverse order. Make sure the zerks on the tine rods are facing up. When positioning the engine, push it all the way forward. Position the large pulley so that it’s parallel with the slot in the base of the aerator.

PL855 Clutch and Throttle Cable Adjustment

Tools:
3/8 inch wrench
3/8 inch nut driver

1. Hold the adjustment screw while loosening the top nut.
2. Lift the cable slightly. Spin the spool to adjust the cable position.
3. Tighten the top nut.

The clutch cable adjustment is correct if engaging the clutch causes the tines to pull the machine forward without the hydrostatic drive engaged.

Tine Replacement (All Models)

Tools:
15/16 and 7/8 inch wrenches
Medium strength thread locker
Wood block

1. Lift up the rear of the machine and support it with the wood block.
2. Loosen the jam nut. Unscrew the tine.
3. Apply thread locker to the new tine’s threads.
4. Screw the new tine into the rod until it’s the same length as the other tines. Spinning the tine 4 times raises it by about ½ inch. If you’re installing a hollow tine, turn the open side of the tine toward the rear of the machine.
5. Tighten the jam nut.

Need Parts for Your Old Billy Goat?

Billy Goat Parts is an authorized dealer for Billy Goat and their manufacturing partners, including Honda Engines. That means we have everything to fix your aerator, whether you have the latest NextGen or an older model like the PL855. Our site has factory parts diagrams available, making it easy to find exactly what you need for your aerator. To order, visit www.billygoatparts.com. We can ship what you need to any address in the U.S. or Canada.

Posted in Uncategorized | Tagged , , | Leave a comment

Spring Sealcoating

Spring SealcoatingSealcoating doesn’t just protect your driveway from harsh winter weather. It can also protect the pavement from damage by heat, water, and UV rays in the summer. Sealing pavement is a process that is great for DIYers at any skill level. You can choose to do the whole process yourself, or tackle some of the easiest steps and leave the rest to professionals for the best results. Here’s what you need to know to correct, clean and protect your driveway this season.

Why Sealcoating Should Be Done Twice Each Year

We mostly think of driveway sealing as a form of winter maintenance. Low temperatures and ice work together to shift and crack the pavement, doing major damage in northern states. However, there are still issues facing your driveway in the summer.

Cracking can still happen thanks to a combination of rain and heat eroding and flexing the pavement surface. Summer weather also brings chemical threats to the table. Concrete breaks down when exposed to UV light, and there’s more of this light in the summer. High heat exposure evaporates liquid compounds in asphalt. At first, this loss of liquid hardens the asphalt, making it more durable. However, any losses more than a year after the asphalt was poured can make the surface brittle. New asphalt can benefit from sealers in as little as 90 days after installation, or after the surface starts turning gray.

Preparing for Sealcoat

The sealing chemicals need a clean surface to bond to. While you can clean cracks by hand, Billy Goat’s Grazor crack cleaner is faster, safer and more effective. It uses a stiff wire brush to remove plants, roots, soil, and debris from cracks without damaging the surrounding pavement.

Concrete cracks that are less than ¼ inch wide can be filled in with a liquid filler or concrete caulk. Any hole or crack that’s more than a ¼ inch wide needs to be filled with repair compound. To get good contact and a complete fill, chip out cracks to form a V-shaped channel. If you’re filling a hole, undercut the pavement. This helps the compound bond to the surrounding driveway. Any dust or debris leftover from chipping can be blown out or cleaned out with another pass from the Grazor. Once the crack is clean, pour the compound in and level it with a trowel. To better match the surrounding material, apply texture to the surface of the fill by gently wiping it with a paintbrush.

It takes anywhere from 12 to 36 hours for fillers and compounds to cure fully. At this point, the rest of the surface is ready to clean. Brooms and debris blowers remove any loose dirt on the surface. Follow this up with a cement cleaner to remove any oil or ground-in dirt left on the surface.

Applying the Sealer

Ideally, concrete sealer should be applied on a warm day with low humidity. Cold and moisture extend the time it takes for the coating to cure. Never apply concrete sealer when outside temperatures or air temperatures are below 50°F, or when it’s raining. If the surface temperature is above 90°F, lightly water the pavement to lower its temperature. Remove any puddles before application.

If you want to do it yourself, you can apply the sealcoat with a roller or a squeegee, pouring out the thick sealer and pushing it around to get complete coverage.

Professional driveway sealing services use high-pressure pneumatic equipment to apply the sealant. This is basically a beefed-up paint gun connected to a tank with a built-in agitator and a heater. This method may cost more, but it gets better consistency and coverage than you can get yourself.

Keep Your Equipment Working

Billy Goat Parts has everything you need for your equipment, whether you own a Grazor crack cleaner, a debris blower, or anything else from their lineup. Since we’re a certified dealer for Billy Goat and their manufacturing partners including Honda and Briggs & Stratton, we carry replacements for every part of your equipment. To make finding parts easy, we have sections for commonly ordered items. Our search engine can show you exactly what fits on your model along with factory parts diagrams, so you don’t have to second guess your order. Visit us at www.billygoatparts.com. We ship across the United States and Canada.

Posted in Uncategorized | Tagged , , | Leave a comment

Planting Sod: What You Need to Know to Establish a New Lawn

Planting Sod: What You Need to Know to Establish a New LawnIs it time to start fresh with a whole new lawn? Are there spots on your lawn that need major repairs? Whether you’re renovating your landscaping, or you’re establishing a lawn around new construction, sod is the fastest way to restore your grass. However, if it isn’t done right, you could throw a lot of money down the drain. Here are steps you can take to get the best results, from cutting away old grass to getting the sod to take root.

Soil Testing

Now is the best time to find nutrient imbalances, so you can add fertilizers and amendments when you have open soil. Sod needs the same soil conditions as regular grass, except for pH. The new grass will get a better foothold in soil that is neutral or slightly acidic. Aim for a pH between 6 and 7.5. Expect at least a two-week wait between sending in your soil sample and getting results.

Selecting and Ordering Sod

Choosing the right sod is no different than choosing the right seed for your lawn. Look for grass varieties that work best in your climate and match any existing grass left on your yard. Usually, you will have to pay more for new varieties, but these grasses will be more tolerant of insects, droughts and other issues.

For the best results, sod needs to be installed within 8 hours of harvesting. Depending on your schedule, you’ll either want to give yourself an extra day before delivery to prepare the soil or have the soil fully prepared ahead of time. If your delivery is too early, shade the sod and keep it moist until you’re ready for installation.

Order at least 5% more sod than you will need for full coverage of your lawn. This compensates for sod that will be cut out to accommodate curbs.

Getting the Soil Ready

Wet down the soil to make it easy to work. It should be moist, but not muddy. You want to make it easy for equipment to cut soil in large chunks.

Use a sod cutter to remove the existing turf. Cutting at least an inch below the surface level should remove the grass down to the roots. This gives you a level surface to lay down the sod, and the new grass won’t need to push through the root system of the old grass. Both the SC121H and Next Gen cutters will work, but the Next Gen will be considerably faster.

Use a tiller to turn the top four inches of the remaining soil. This loosens the dirt, making it easier for new roots to take hold and bind to your lawn. If you need to make adjustments to soil nutrients, add amendments as you’re tilling to work them in.

Use the back of a metal rake to smooth down the soil surface. When you’re done, you should have a flat surface that is about one inch lower than the surrounding curbs and pavement. Lightly water the surface of the soil to remoisten it.

Laying Down Your New Sod

While laying down your new grass, you need to prevent soil compaction. Use a kneeling pad or board to spread out your weight, and go over footprints with a rake.

Start rolling out sod on the longest straight section of your yard. This is usually next to a fence or building. As you lay down each section, smooth out the soil to remove any wrinkles that may interfere with ground contact.

When you start the next section, start with a half roll of sod. Using a short section offsets the seams at the ends of the rolls. This decreases the chance of having the sod roll up before taking root. Be sure to cut holes for curbs, sprinklers, and other landscape features. This helps the sod lay flat without covering these objects.

Once all the sod is down, use a lawn roller to eliminate any gaps between the sections. Roll over your lawn going up and down then left to right, or vice versa. You know you have good ground contact when you can walk across your lawn without your feet sinking into the soil. Keep the ground moist and avoid foot and vehicle traffic for the next month. The seams will disappear, and you can return to normal lawn care.

When You Depend On Your Equipment, You Need Billy Goat Parts

Billygoatparts.com is more than just a parts warehouse. We’re an authorized dealer for Billy Goat and their manufacturing partners including Honda Engines and Briggs & Stratton. That means we carry a full range of OEM parts and accessories designed for your equipment. Check out our “Popular Parts” pages for common replacement parts, or use our search engine to find specific parts for your equipment. We can ship your order to any address in the United States or Canada.

Posted in Uncategorized | Tagged , , | Leave a comment

Spring Pressure Washer Maintenance

Getting Your Pressure Washer Out of StorageBilly Goat may have phased out their pressure washer line, but that doesn’t mean you have to give up on your equipment. Here’s everything you need to know to get your pressure washer out of storage and ready for a new season of cleaning.

The Initial Inspection

You should have stored your pressure washer with the pump full of pump saver or RV antifreeze.

Inspect the hoses, wand and spark plug cable. The rubber insulation on these parts is a common target for mice. Likewise, make sure the engine air filter hasn’t been torn apart to make a nest.

Check the pump inlet for the seal and screen. If these parts fell out, putting them back in now will keep you from having to hunt them down. While you’re at it, make sure that the pressure washer tips are in their places on the handle.

Air up the tires. Attempting to roll the washer with flats may cause the tires to roll off the beads.

Check the pump oil by looking at the sight glass on the side of the pump. The oil should come up to the middle of the glass. If the oil looks cloudy, replace it. While you can use SAE 20 non-detergent oil, AR and CAT Pumps both make pump-specific oil with seal conditioners that will help your pump last longer.

Engine

If you left the tank full of fuel, drain it and add new gas. Honda GX engines have a sediment cup built into the base of the carburetor. You can drain the fuel by removing this cup and turning on the fuel valve. On other engines, use a siphon to drain the tank, then get the rest of the fuel out by disconnecting the hose that leads to the carburetor.

If the carburetor sits with fuel inside of it, deposits can form around the carburetor jets. To clean these jets, remove the air filter and spray carburetor cleaner around the jet openings. Major buildup may need to be removed by taking the carburetor off the engine and spraying the jets from the inside. Never use a needle to remove clogged passages: this can widen the jet openings, throwing off the air/fuel mixture.

Check the oil, adding more as needed. If the oil looks slightly milky, it’s contaminated with water. Drain and replace the oil before starting the engine.

The First Start

Prime the pump by connecting the inlet hose and holding down the trigger until you see water dripping out of the nozzle. Start the engine and let it warm up. If you added oil to the combustion chamber before storage, expect to see some black exhaust smoke. This is just the oil burning off.

Both pump saver and RV antifreeze are non-toxic. You can spray either chemical over a wide patch of ground, or spray into a bucket and pour the liquid down a drain. Once the water looks clear, your pressure washer is ready to use.

Addressing Common Problems

Low water pressure: Check the hoses and pump for leaks. If there’s a crack in the wand or high pressure hose, shut off the washer. Replace these parts before using your machine again. If you let the engine idle too long, the unloader valve will open to relieve pressure on the pump. Shut off the engine and give the pump at least 5 minutes to cool down. Most leaks at the pump are caused by loose connections or bad seals on the inlet or outlet. If the pump still leaks, it may need some new internal seals or a complete rebuilt.

Running rough: If you’re using a long garden hose, it can take a lot of priming to purge all of the air. Shut off the engine and hold down the trigger until you get a steady, consistent stream of water out of the nozzle.

Billy Goat’s pressure washers are designed to use cold water. Water above 100°F can cause problems with the pump seals. Even if you’re using a cold faucet, water inside the inlet hose can heat up in the sun. Shut off the washer, disconnect the hose, and let the water run until it turns cold.

Spikes in water pressure: The unloader valve is jammed or isn’t set correctly. This keeps water from recirculating back into the pump. Check the pump owner’s manual for instructions on how to set this valve.

Keep Your Equipment Running

Billy Goat Parts is your one-stop shop for everything on your pressure washer. We’re an authorized dealer for Billy Goat, as well as their manufacturing partners including CAT and AR Pumps. That means you can get replacements for everything on your machine from one source. Our search engine lets you find parts specifically for your model and serial number, so you’ll always order exactly what you need. Visit us at www.billygoatparts.com. We ship across the United States and Canada.

Posted in Uncategorized | Tagged , , | Leave a comment

Billy Goat F9 Blower: Save Time and Money Cleaning Yards and Construction

Billy Goat F9 Blower: Save Time and Money Cleaning Yards and ConstructionIf you’re a commercial landscaper, a maintenance contractor or you have a large property, you know what a pain it can be to clear debris with a backpack blower. Fortunately, Billy Goat has a solution: the F9 wheeled blower. Its commercial four-stroke engine and large composite impeller make quick work out of leaves, dust, and debris. This cuts down on job times and saves you money on maintenance and labor costs.

Good Performance is More than Engine Power

The engine drives a composite 17-inch fan and housing work together to create a smooth, low turbulence air chamber. This makes the F9 quieter and more efficient than metal housing blowers. Lower turbulence also means less stress on components, increasing the service life of the engine.

The fan has twice the blades you’ll find on an equivalent metal blower, and it’s cast in a single shot. That means that despite its complex shape, it’s one solid piece that has no bolts that will loosen up with use. It also makes the F9 lighter than an equivalent metal blower, making it easier to push. As equipped from the factory, this debris blower weighs 143 lbs.

The offset handle places the operator directly in front of the nozzle, making it easy to see where the blower is moving air. The angle of the nozzle is controlled by Billy Goat’s exclusive Aim N Shoot system. Using a lever on the padded handle, the nozzle can be moved up and down, quickly going from removing surface buildup to rolling piles together for disposal. This also allows the F9 to use a smaller opening than door control blowers. Air exits the four-inch discharge at just below 200 MPH, pushing out up to 1,700 cubic feet of air per minute. That’s over 50% faster than an equivalent split door model.

Engine

Powering the F902H is Honda’s GX270. There’s a reason the GX Series is an option for nearly every piece of small engine equipment on the market: it has a reputation for bulletproof reliability. Features like a ball bearing-supported crankshaft and a heavy-duty balancing shaft reduce wear and vibrations, while Oil Alert keeps the engine from burning itself up when there’s too little oil in the crankcase.

Billy Goat still lists the Subaru-powered F902S and F902SPH in their product catalog. However, both models were discontinued a few months after Subaru shut down their small engine division.

Accessories

Billy Goat offers several ways to upgrade the F9 to fit your operating conditions. If you’re working in tight spaces, you can add a front caster wheel that makes for easier turns. Dealing with hills? The parking brake clamps down on one of the rear wheels to keep the blower from rolling. Hate dealing with flats? You can replace the front tire with one filled with foam. It never requires air.

Using the quick hold down kit, you can add a low profile mount to your trailer, locking down this blower in seconds for transport.

Warranty

Billy Goat guarantees the F9’s impeller and housing for 5 years of use, while the rest of the blower is guaranteed for a year of commercial use or three years of residential use. Honda guarantees its GX-Series engines for three years of commercial use.

For Everything Billy Goat, Visit Billy Goat Parts

Want to add a parking brake or a castor wheel to your F9? Need to do some maintenance? Then you need www.billygoatparts.com. We’re a certified dealer for Billy Goat and Honda Engines, which means we carry everything for your wheeled blower. Have a Subaru-powered model? We’re still part of Industrial Power Products’ dealer network, which means we carry parts for these discontinued engines.

We have sections for commonly ordered parts like spark plugs and air filters, as well as an advanced search engine. When you look up parts, you can see exactly what fits your equipment, as well as factory diagrams that let you see where those parts fit on your machine. We can ship your order to any address in the United States or Canada.

Posted in Uncategorized | Tagged , , | Leave a comment

Billy Goat F6 Walk-Behind Blower: The Best Alternative to Backpack Blowers

Billy Goat F6 Walk-Behind Blower: The Best Alternative to Backpack BlowersBackpack leaf blowers beat raking, but they leave a lot to be desired. They’re noisy, heavy, and their two-stroke engines wear out quickly. With the Billy Goat F6 walk-behind blower, you don’t have to make these compromises. It’s small enough for residential use, tough enough for commercial use, and delivers two to three times more performance than the best backpack blowers.

Composite Construction: More than Just Weight Reduction

When comparing composites to metals, there’s one obvious advantage: weight. When Billy Goat made the switch to composite components, they were able to produce blowers that weigh 30% less than their steel equivalents. However, the benefits don’t end there.

Tolerances on steel blowers have to be big, leaving gaps between the housing and blades that create airflow-disrupting voids. There are also limits to how a metal fan can be shaped, further increasing turbulence. The result is less output per horsepower, more noise and more vibration stresses on the engine shaft.

By using composite construction, Billy Goat is able to make a tight-fitting impeller housing. Inside that housing, you’ll find a fan with 16 curved blades, twice as many as an equivalent steel blower. Closed faces on the ends of those blades improve the seal between the impeller and the housing. The result: more power, less noise, and longer engine life. Durability is better, too. Since the impeller is cast as a single piece, there aren’t any fasteners that can shake loose. That means there’s one less thing you need to worry about for maintenance.

Getting Air Where You Need It

The F6 comes with Billy Goat’s Aim N Shoot nozzle. Using a lever on the operator handle, you can move the nozzle up and down as you work. This lets you blow across the ground surface to peel off layers of compacted debris or send air upward to move leaf piles. If you work around buildings, you can add a 90-degree elbow to shoot air forward and pull debris away from walls.

By rotating the entire nozzle as a unit, Billy Goat was able to fit it with a small opening for increased velocity. As a result, blowing force is up to 50% higher than a comparable split door blower. Cross-shopping with a backpack blower? Between the bigger engine and high-performance impeller, you can expect jobs to take 40% less time.

What if you need to get into hard-to-reach spaces around bushes and landscape fencing? You can’t push this blower into those areas, but you can reach them if you add a hose kit. It uses a 10-foot hose connected to a long metal nozzle, letting it get into places that would normally require a backpack or handheld blower.

Models and Engines

Billy Goat makes two versions of the F6. Both models offer the same impeller design and output, despite using different engines.

The 601X is powered by a 208cc Briggs & Stratton Professional engine. It’s designed to be as easy to start as possible. In fact, the company guarantees the engine will start with the second pull for the duration of the warranty. It weighs just 83 lbs, about the same as a small walk-behind mower.

The 601V is powered by Briggs & Stratton’s new Vanguard single-cylinder engine. It adds features like an air filtration system with cyclonic pre-filtering and a fuel system that is resistant to stale fuel. This gives it an edge over the Professional when it comes to durability. Choosing this engine increases the blower’s weight to 89 lbs.

Warranty

Billy Goat guarantees the blade and housing for 5 years and the rest of the blower for one year of commercial use or three years of residential use. Briggs & Stratton guarantees both Professional Series and Vanguard engines for three years of commercial use.

Getting Parts and Accessories For The F6 Blower

Whether you have an F6, a Hurricane, or anything else from Billy Goat, you can get everything you need for it at Billy Goat Parts. As an authorized Billy Goat dealer, we carry the full line of replacement parts and accessories for these blowers. Need to work on your F6’s engine? We’re also a Briggs & Stratton and Vanguard dealer. Our site makes finding parts easy by offering sections for common replacement parts as well as a search engine that finds parts and factory diagrams specific to your equipment. To order, visit us at www.billygoatpart.com. We ship across the United States and Canada.

Posted in Uncategorized | Tagged , , | Leave a comment

Electrical Troubleshooting for Your Billy Goat Equipment

AGR1300H Landscape AugerIs the engine in your Billy Goat running poorly? Are you having trouble getting the electric starter to work, even though the battery is fine? Maybe it’s time to look at your equipment’s electrical system. These tips will help you troubleshoot common problems, so you can get your equipment back to work.

Check These Items First

These are the most common, easiest-to-check problems with small engine electrical systems:

Are all safety switches disengaged?
Your Billy Goat equipment may have a bail that needs to be closed or levers that need to be open for the engine to start. Make sure the cables for the controls are tensioned correctly and move smoothly when used. Stand-on blowers won’t start unless the operator is standing on the platform and the drive levers are in neutral.

Is there enough oil in the crankcase?
Most engines used by Billy Goat have a low oil sensor. When the float inside the crankcase gets too low, it cuts power to the ignition. This keeps you from running the engine and damaging it.

Are the spark plugs connected?
It’s good practice to disconnect the spark plug wires before working on your equipment. That way, if you spin the crankshaft, you won’t start the engine. Make sure you didn’t leave them disconnected after the repair.

How Does the Electrical System Work?

Magnets attached to the inside of the flywheel pass by a stator made of a series of copper wire windings. This generates an alternating current. Electrical systems on the smallest engines send that current directly to the ignition coil. However, most engines used by Billy Goat pass the electricity through a rectifier or diode, turning the stator’s alternating current into direct current. If the engine uses a recoil starter, the electricity goes directly to the ignition system and any accessories. On electric start models, the current goes to the battery, then the rest of the equipment.

Modern small engines use a solid-state ignition system. As the engine spins, magnets on the outside of the flywheel pass by a coil or armature. This activates the coil, sending electricity to the spark plug.

Diagnosing Spark Plugs

Even with regular maintenance, the spark plugs can fail prematurely. Vibrations and impacts can break the ceramic insulator, causing the plug to short out on the head. If the fuel mixture is off, it can form deposits on the electrodes, limiting spark.

Check the condition of the plug’s electrodes. Their appearance can tell you what’s going on inside your engine, and why your spark plugs aren’t working:

Wet – There’s too much fuel in the combustion chamber. This usually happens when the engine is over-primed, or the equipment was tilted on its side with the carburetor facing down. Let the engine sit for a few minutes to let the fuel evaporate before trying to restart.
Black – The engine is running too rich. Vanguard EFI engines can adjust the fuel mixture to match incoming air, but other engines may need a high altitude kit. These kits include smaller jets that reduce the amount of fuel mixed with the thinner mountain air.
White – The engine is running too lean, leaving a layer of ash on the plug. This is usually caused by a leak in or around the carburetor. Check the carburetor for cracks and install a new seal between the carburetor and engine. If you installed an altitude kit and are now working at a lower elevation, install the old jets.

Problems Caused by a Poor Ground

If the ignition module doesn’t have a solid ground connection, it can cause the ignition module to overheat and fail. Use sandpaper or a file to remove any corrosion on the mounting points for the coil.

Having a problem with your electric starter? Follow the negative battery wire to the ground connection. Check the bolt for tightness, and sand or file off any corrosion.

Flywheel Misalignment and Stator Issues

Ignition timing is handled by the flywheel, so if it’s not in the right spot, it can throw off engine performance, make it hard to keep a steady RPM or prevent the engine from running entirely. This is usually caused by a worn or damaged flywheel key.

To check the key, you need to remove the flywheel with a puller. With the flywheel off, you can inspect the key and keyways on both the flywheel and crankshaft for damage.

With the flywheel off, you can check for continuity between the stator body and the wiring for each phase connector on the plug. If you get any reading other than “OL,” there’s a short in the wiring and the stator is bad.

We Have the Parts You Need for Your Billy Goat

Billy Goat Parts is more than a Billy Goat dealer. We’re also a certified dealer for Subaru, Honda, Briggs & Stratton, and Vanguard. That means we have the OEM parts for whatever is powering your turf equipment. If you need something for your debris loader, overseeder, blower, brushcutter, auger or vacuum, visit us at www.billygoatparts.com. We ship across the United States and Canada.

Posted in Uncategorized | Tagged , , | Leave a comment

Managing Winter Turfgrass Diseases

Managing Winter Turfgrass DiseasesAs winter draws to a close and temperatures rise, your lawn may not grow like you hoped. Wet winter conditions are perfect for harboring molds that can kill your grass, and by the time it appears, there’s not much you can do. These tips will help you identify the underlying causes of these diseases and address them with changes to your lawn care.

What Causes Winter Turf Diseases?

These diseases don’t appear in winter, but they’re directly caused by high levels of moisture during the winter months. Mold growth mostly happens when there are heavy snows before the ground freezes. When the snow thaws, it completely soaks the soil. This creates the perfect conditions for mold growth. These diseases mostly show up in the upper Midwest. However, a mild winter in more northern states or heavy rain in warm climates can create the conditions these molds need to thrive.

While you can’t control the weather, they are ways you can adjust your lawn care strategy to reduce infections. Overfertilizing in fall makes grass hold more moisture, which can feed mold. The issue usually isn’t applying too much fertilizer, but applying fertilizer that acts too fast. Even cool-season grasses grow slower as temperatures drop, slowing nutrient absorption. Shifting away from synthetic to organic fertilizers will usually solve this problem. Remember to check the hopper settings on your Billy Goat overseeder if you’re spreading pelleted fertilizer. If you’re making two passes for coverage, it should be set to half of the recommended drop rate.

Cutting the lawn short before the first snow helps water evaporate. However, cutting too low damages crowns, making the grass more susceptible to infection. Approach the end of the growing season the same way you would when aerating or dethatching your lawn. You want to maximize soil exposure while leaving the leaf structure intact, and you want to work toward this height while trimming no more than 1/3 of the grass’ total length.

There are two main types of winter molds: snow mold and red thread. Here’s how you can identify and deal with each mold.

Snow Mold

Gray and pink snow mold appears at the end of winter or early spring as the snow begins to thaw. This damage appears as large rings of dead grass. Gray mold only attacks leaves, while pink mold attacks the entire grass plant. These molds mostly affect cool-season grasses, particularly fescue and Kentucky bluegrass.

Fungicides are ineffective once the mold starts killing grass in the spring. If you’ve had problems in the past with snow mold, apply a fungicide in the fall to stop spores. The application needs to be at least two weeks before overseeding. Otherwise, grass growth may be hampered, and you could end up spreading surviving spores during soil preparation.

As the snow thaws, gently rake the grass gently to remove matting. This helps the grass and soil dry out faster. If you use a power rake, keep it at the highest setting and go slow to keep from pulling grass out of the wet soil.

Red Thread

Red thread mostly affects cool-season grasses like Kentucky bluegrass, red fescue, ryegrass, and bentgrass. However, this fungal disease can grow on almost any grass variety. Spores usually appear when temperatures are in the mid-60s to low 70s.

At first glance, the grass may look dead, but it’s just spore coverage. In its first stage, the fungus appears as thread-shaped branches across the grass blades. In its second stage, the threads are replaced by fuzzy pink growths at the base of the grass blades. This can be confused with pink snow mold from a distance. Look closer, and you should see branched structures on these growths.

If you see spores, stop their spread by using a bagging mower when cutting grass, or by picking up clippings with a lawn vacuum.

Use a soil test to check your lawn’s nitrogen and pH. Low nitrogen levels slows grass growth, opening up plants to the disease, while acidic soil promotes fungus growth. Getting soil pH to between 6.3 and 7 seriously hampers mold growth.

Red thread stays dormant in thatch. While removing thatch won’t remove all the spores, good thatch management will keep infections at bay. Removing leaves in the fall and mulching grass clippings can help micronutrients break down thatch. Overfertilizing can lead to excessive thatch. This will boost the spread of spores, even if fertilizing brings nitrogen levels back in line.

We Can Help You Get More from Your Billy Goat Equipment

For dethatching, aerating, lawn cleanup, overseeding and fertilizing, your Billy Goat equipment is critical to the maintenance of your lawn. When you need to fix this equipment, you need Billy Goat Parts. We’re an authorized Billy Goat, Honda, Subaru, and Briggs & Stratton dealer. That means we offer OEM replacements for everything on your equipment. Visit us at www.billygoatparts.com. We ship across the United States and Canada.

Posted in Uncategorized | Tagged , , | Leave a comment

Choosing Between Reciprocating, Rotational and Drum Aerators

Reciprocating vs. Drum AerationWhen it comes to soil aerators, you have three choices in design: reciprocating, drum and rotational. Which technology works best for residential lawns? Which one works best for large areas like parks and campuses? Is it worth the extra cost to go from a drum aerator to a reciprocating aerator? Here’s what you need to know to pick the right Billy Goat aerator design for your needs.

The Types of Aerators

Drum Aeration

A drum aerator is a large cylinder covered in tines. Some aerators are heavy enough on their own to force the tines into the soil, while others can be filled with water to add weight. This is the oldest design on the market, and thanks to its mechanical simplicity, the cheapest. Billy Goat’s AET60 functions like a drum aerator, but it uses tine stars instead of a drum. Weight is added by folding in the extensions or placing bricks or water jugs on top of the aerator platform.

Rotational Aeration

The aerator is supported on wheels connected to a chain drive. This drive system spins tine stars. This increases the number of holes that the tines can make. It also separates the weight of the aerator from the tines, making them easier to lift out of the ground. Billy Goat’s AET48 is a rotational aerator.

Reciprocating Aeration

A reciprocating aerator has tines that move up and down. Since the tine motion is independent of the aerator’s speed, it’s easy to change the hole density. Reciprocating aerators only need a few tines. This concentrates wear, requiring more frequent tine replacement. However, the tines are easier to access and replace than drum and rotating aerators. Billy Goat’s PLUGR and AE-Series models are reciprocating aerators.

What are the Advantages and Disadvantages of Each Type of Aerator?

Reciprocating

Advantages:
– Increasing hole density makes it possible to aerate an area in one pass, while other machines need to make two passes.
– The tines don’t need to be lifted out of the soil when turning, reducing turf damage and greatly speeding up work in small areas and around landscape features.
– It’s the only design that can aerate in reverse.
– Density can be varied by changing ground speed. This is handy for making more holes in areas that need to be reseeded, as well as relieving compaction in high traffic areas.

Disadvantages:
– Only practical for small machines.
– More expensive than other aerators.

Drum

Advantages:
– Works faster than a reciprocating aerator when covering large stretches of ground.
– It’s easy to scale up the size of an aerator. There are stand-alone walk-behind and stand-on ZTR models as well as trailers ranging in sizes that can be pulled by anything from a lawn mower to a large tractor.

Disadvantages:
– Tines must be lifted out of the ground, either physically or by using a hydraulic lifter. Failure to do so can damage turf and sprinkler systems.
– Lots of tines to maintain.

Rotational

Advantages:
– High hole density, requiring fewer passes than drum aerators.
– Easy to adjust weight to get the right amount of soil penetration.
– Billy Goat’s AET aerators mount tine stars on supports that can swivel. Once unlocked, the trailer can turn in the soil. However, the supports have to be locked back into place before the next pass.

Disadvantages:
– Only available as a trailer attachment, so it’s not a practical option for small jobs.
– Needs considerable power to pull, requiring a tractor.
– More expensive than drum aerators.

Which One is Right for Me?

Reciprocating aerators are perfect for most lawn care tasks due to their small size and flexibility. These should be your first choice for professional landscaping or rental in suburban areas.

If you need to aerate large areas, including cemeteries, facility grounds, or play fields, drum and rotational aerators are your best options. The maneuverability of rotational aerators make them the best choice overall, if you don’t mind the added cost.

No Matter What You Choose, We Can Help You With Your Billy Goat Aerator

From tines to major components, Billy Goat Parts has the OEM parts and accessories to keep your equipment running. Despite our name, we’re more than just a Billy Goat dealer. We’re also an authorized dealer for Tuff-Torq, Honda Engines, and Briggs & Stratton, so we’re able to offer replacement parts for everything on your equipment. Ordering is easy, too. Our site has sections for common replacement parts, and our search engine can find compatible parts for your model. We even have factory parts diagrams built into our site, so you can see exactly what you’re ordering, and where it fits. We can ship your order to any address in the United States or Canada. Visit us at www.billygoatparts.com.

Posted in Uncategorized | Tagged , , | Leave a comment