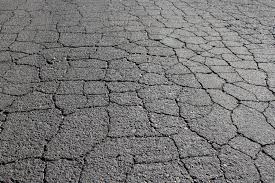
 Sealcoating doesn’t just protect your driveway from harsh winter weather. It can also protect the pavement from damage by heat, water, and UV rays in the summer. Sealing pavement is a process that is great for DIYers at any skill level. You can choose to do the whole process yourself, or tackle some of the easiest steps and leave the rest to professionals for the best results. Here’s what you need to know to correct, clean and protect your driveway this season.
Why Sealcoating Should Be Done Twice Each Year
We mostly think of driveway sealing as a form of winter maintenance. Low temperatures and ice work together to shift and crack the pavement, doing major damage in northern states. However, there are still issues facing your driveway in the summer.
Cracking can still happen thanks to a combination of rain and heat eroding and flexing the pavement surface. Summer weather also brings chemical threats to the table. Concrete breaks down when exposed to UV light, and there’s more of this light in the summer. High heat exposure evaporates liquid compounds in asphalt. At first, this loss of liquid hardens the asphalt, making it more durable. However, any losses more than a year after the asphalt was poured can make the surface brittle. New asphalt can benefit from sealers in as little as 90 days after installation, or after the surface starts turning gray.
Preparing for Sealcoat
The sealing chemicals need a clean surface to bond to. While you can clean cracks by hand, Billy Goat’s Grazor crack cleaner is faster, safer and more effective. It uses a stiff wire brush to remove plants, roots, soil, and debris from cracks without damaging the surrounding pavement.
Concrete cracks that are less than ¼ inch wide can be filled in with a liquid filler or concrete caulk. Any hole or crack that’s more than a ¼ inch wide needs to be filled with repair compound. To get good contact and a complete fill, chip out cracks to form a V-shaped channel. If you’re filling a hole, undercut the pavement. This helps the compound bond to the surrounding driveway. Any dust or debris leftover from chipping can be blown out or cleaned out with another pass from the Grazor. Once the crack is clean, pour the compound in and level it with a trowel. To better match the surrounding material, apply texture to the surface of the fill by gently wiping it with a paintbrush.
It takes anywhere from 12 to 36 hours for fillers and compounds to cure fully. At this point, the rest of the surface is ready to clean. Brooms and debris blowers remove any loose dirt on the surface. Follow this up with a cement cleaner to remove any oil or ground-in dirt left on the surface.
Applying the Sealer
Ideally, concrete sealer should be applied on a warm day with low humidity. Cold and moisture extend the time it takes for the coating to cure. Never apply concrete sealer when outside temperatures or air temperatures are below 50°F, or when it’s raining. If the surface temperature is above 90°F, lightly water the pavement to lower its temperature. Remove any puddles before application.
If you want to do it yourself, you can apply the sealcoat with a roller or a squeegee, pouring out the thick sealer and pushing it around to get complete coverage.
Professional driveway sealing services use high-pressure pneumatic equipment to apply the sealant. This is basically a beefed-up paint gun connected to a tank with a built-in agitator and a heater. This method may cost more, but it gets better consistency and coverage than you can get yourself.
Keep Your Equipment Working
Billy Goat Parts has everything you need for your equipment, whether you own a Grazor crack cleaner, a debris blower, or anything else from their lineup. Since we’re a certified dealer for Billy Goat and their manufacturing partners including Honda and Briggs & Stratton, we carry replacements for every part of your equipment. To make finding parts easy, we have sections for commonly ordered items. Our search engine can show you exactly what fits on your model along with factory parts diagrams, so you don’t have to second guess your order. Visit us at www.billygoatparts.com. We ship across the United States and Canada.
