CR550HC Power Rake

CR550HC Power Rake

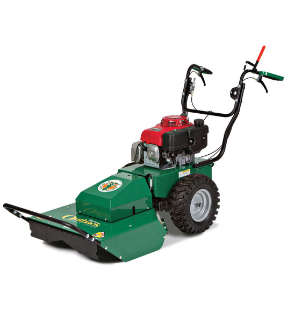
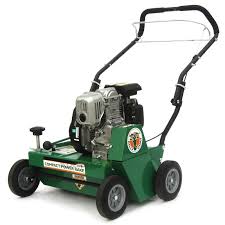
There seems to be a big gap between dethatching tools: you can use a hand rake for hours of arduous pulling of compacted grass, or you rent a big, heavy power rake that is difficult to maneuver, making it a chore to use on smaller lawns. The CR550HC fits in between these two extremes, providing the power to get the job done quickly while still being easy to maneuver around trees, fences and other obstacles.

Performance

This power rake uses a 20-inch wide flail reel to cut through and peel up thatch. Unlike other Billy Goat rakes, the flails don’t have a swinging action, so there’s nothing here to act as a self-propulsion system. The upside is that this simplicity means the whole unit weighs about the same as a large walk-behind mower without skimping on construction quality. When pushing the rake at 1.5 mph, it can cover 13,200 square feet per hour.

For tougher jobs, Billy Goat offers a vertislicing reel. It can thin running grasses for better drainage and easier overseeding and has no trouble cutting through taller grass. The CR550HC is designed so that the reel can be switched out in about 10 minutes, letting you set it up for the job at hand.

The cutting depth can be set between 0.5-0.75 inches using a knob on the deck. This height is infinitely adjustable to get even wear across the flail surfaces so they last longer.

Ease of Use

This rake uses a 5 hp horizontal shaft version of Honda GC series engine, a motor usually found on top quality mowers. Its overhead cam design uses a timing belt that is designed to last the life of the motor while keeping engine noise down and carrying oil to the head to keep everything lubricated. Along with precision machined components and an efficient cross-flow valvetrain, this engine uses less fuel, makes less noise and vibration, and produces fewer emissions without making it harder to maintain or use. Even starting is easy thanks to an automatic decompression system.

The CR550HC’s single piece frame, low part count and fully exposed motor help limit the transfer of vibration to the operator and make the rake easier to maintain and repair. The reel rides on cast iron bearings with grease zerks for years of reliable performance, while the idler pulley is adjustable to ensure maximum drive belt life. Both the flail reel and vertislicing reel have blades that can be replaced individually if one gets bent or damaged.

The operator grips a padded handle with an interior-mounted bale reduces hand strain. That bail controls the reel clutch, making it easy to stop the reel when making turns. After the job is done, the handle folds down to take up less room when storing or transporting.

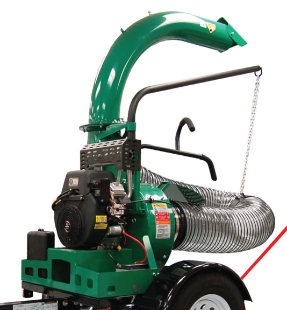
Getting Parts for Your Billy Goat Power Rake

www.billygoatparts.com is a certified dealer for both Billy Goat and Honda Engines so we can provide you everything you need for your CR550HC. Whether you need a vertislicing reel for tough jobs, some odds and ends for maintenance or major components for repairs, we can ship you what you need to any address in the U.S. or Canada.

Posted in Uncategorized | Tagged , , | Leave a comment

Caring for the Bag on Your Billy Goat Vacuum

Caring for the Bag on Your Billy Goat Vacuum

Inevitably, the bag on your Billy Goat vacuum will need to be replaced, but it will last a lot longer with the proper care. Here’s what you need to know about cleaning, attaching and maintaining the bag to maintain your vacuum’s performance.

Bag Maintenance and its Effect on Performance

The bag on outdoor leaf and contractor vacuums works a lot like the bags found on indoor vacuums: air and dirt are sucked into the machine then pushed out through pores in the bag, trapping dirt along the way. As the vacuum is used, the fabric is saturated with dirt, while the addition of debris reduces the exposed area, limiting air flow. In turn, this reduces suction power, hampering performance.

When it comes to debris, Billy Goat recommends emptying the bag when it’s half full to ensure air flow. If the material is wet, it can’t be reduced as effectively by the impeller, so you should expect to empty the bag more frequently. The bag should also be rinsed off after each use, but more intensive cleaning may be needed occasionally to get rid of build-up.

Bag Break-In

A new bag can be used straight out of the package, but it will perform better if it’s given time to break in. This will open up the pores in the fabric and push the material into shape when loaded, letting it hold more and clog less frequently.

Breaking in a bag is simple: mount the bag to the vacuum, set the vacuum on a level surface that is free of dirt, such as a driveway, and start the engine. Set the motor to half throttle and let it run for a half hour.

If you’ve just washed the bag, it’s a good idea to go through this break-in process again to push out any remaining soap and debris while stretching out the bag fabric.

Bag Attachment and Removal

To install a bag, start by lifting the door on the vacuum and sliding the front opening of the bag down through the slot. Once seated, lock the four straps onto the handle, working front to back. Make sure the two clips on the bottom rear of the bag are closed.

When it’s time to empty the bag, shut off the engine and wait until the motor and impeller come to a complete stop. Unlatch the two clips on the bottom of the bag, then lift the bag and undo the straps, starting at the back and moving forward. Gripping the bag at the center will take the tension off of the straps and help push out some of the debris, making the bag lighter and easier to move. Finally, slide the opening up out of the vacuum and tilt the whole bag backward to dump out its contents.

Cleaning

After using the vacuum, remove the bag and turn it inside out to remove any clinging leaves and debris. Rinse off any dust left on the surface with a garden hose. Let the bag dry completely before using it again. If you’re cleaning several lawns a week, it’s a good idea to have a spare bag on hand so one can be on the vacuum while the other is drying.

Eventually, dirt build-up will clog the bag fabric, preventing airflow no matter how much debris is inside. At this point, the bag should be washed in water and a mild detergent. Wipe away debris and rinse the surface as usual before using soapy water, then rinse again before drying. Never uses a pressure washer, as it can damage the fabric.

Dealing with Excessive Dust During Operation

If you’re getting a coating of dust from the exiting air as you vacuum, it’s time to switch to a felt bag. This type of bag has finer pores to trap this dust, but as a result, it will clog up faster and require more frequent cleaning. This is usually an issue when vacuuming dry, fine soil and concrete dust.

Getting a Replacement Bag

Need a new bag, a different type of bag, or just want to keep an extra on hand so your vacuum is always ready to work? Billygoatparts.com offers parts and accessories for Billy Goat equipment as well as their manufacturing partners so you can get anything you need from bags to spark plugs. Our site uses factory descriptions and diagrams so you can quickly find the right part for your equipment, and we can ship your order anywhere in the U.S. or Canada.

Posted in Uncategorized | Tagged , | Leave a comment

Troubleshooting Your Billy Goat Aerator

Billy-Goat-Aerator

Not getting the performance you want from your Billy Goat aerator? This type of equipment has some eccentricities that need to be addressed to ensure it can reduce soil compaction. Here’s what you need to know from selecting the right type of tines to preparing your lawn for aeration.

When Not to Aerate

Before you put your equipment to work, make sure you’re helping your lawn instead of hindering it. There are three reasons why you shouldn’t aerate:

– The plants are no more than a year old. Aerating could pull these new plants out of the soil and can even peel up fresh sod.

– The ground is muddy. This will keep the tines from creating solid holes, and the weight of the aerator can increase compaction.

– The grass isn’t in its peak growing season. Right now, cool-season grasses like Zoysia and Bermudagrass are growing, which means they’ll be able to fill in the holes created by the aerator, while lawns that only have summer season grasses won’t recover quickly. When aerating, the grass should have at least four weeks of growth ahead before frost or high summer temperatures restrict growth.

Spike vs. Coring Tines

Billy Goat aerators come with coring tines because they’re the most effective option for most soil conditions. These tines are hollow, cutting plugs out of the soil and dropping them onto the turf. To get rid of these plugs, let your lawn mower chop them up. Keep in mind that this is hard on the blades, so they’ll need to be sharpened afterward.

Spike tines punch a hole in the soil without removing material, so there are no cores to deal with. This method helps break up the soil, but it also causes compacting directly around the hole. This type of tine works well in sandy soil which will crumble around the hole instead of compacting, but the compaction can cause issues on heavy clay soils.

Tine Wear

Tines are made out of self-scouring material, so they retain their shape as they wear. Eventually, they’ll wear down to a point that they’ll become ineffective: spike tines can become too short to penetrate the soil, while the edges of core tines will roll over, preventing a clean cut and removal of the plug. As the tines wear, the chance damage when striking rocks and other obstacles increases.

To get the most wear from your tines, check to make sure the nuts and bolts holding them on are tight before using your aerator and clean the tines after use. Tines should be replaced if they’ve worn over one inch regardless of performance.

Wear will be much higher with models that use FLEXTECH arms since a single tine is doing the work of 5 or more tines on a tine star or roller-equipped aerator. No matter what type of aerator you have, it’s a good idea to keep some replacements on hand.

Preparing the Soil

If they’re in good condition, spike and coring tines should have no problem cutting through the soil. If you’re still having problems, the issue could be caused by soil moisture.

The ground should be moist, but not muddy. This will soften the soil to make it easy to for the tines to penetrate the soil without the resulting holes collapsing or the mud clogging or sticking to the tines. If it hasn’t rained recently, water the lawn so that it absorbs one inch of water. Depending on how bad the compaction is, this can be done the day before aerating, or it may take a week of adding small amounts of water to ensure it’s absorbed by the soil instead of running off.

Weight and Depth

Smaller models use the engine to provide the necessary weight to operate, but larger models need extra mass to ensure the tine is forced into the soil instead of pivoting and lifting the aerator. The AE400 has a built-in water tank that adds 50 lbs. to the weight of the machine, while towable aerators have areas to add water-filled tanks that each add 125 lbs. to the weight of the trailer. Folding in the wings of the 36/60” towable will give the tines enough weight to penetrate compacted soil.

Getting Parts to Repair Your Aerator

If you need something for your Billy Goat equipment, www.billygoatparts.com can help. We’re a certified Billy Goat dealer, which means we’re able to ship OEM parts and accessories for your aerator to any address in the U.S. and Canada.

Posted in Uncategorized | Tagged , , | Leave a comment

Mounting a Truck Loader

billy goat truck loaders

How do you get leaves and other lawn debris from the ground into your trailer? Billy Goat makes several debris loaders that can do the job, but they need to be in the right place to be effective. That’s why they have the CustomFit system: these bolt-on accessories let you adapt your loader to fit a variety of operating locations from light pickups to stake bed trailers.

Tailgate Hanger

This hanger uses two arms that bolt into the box sections on your loader’s base. Once installed, the arms are lowered over the tailgate, then two clamps are tightened down to keep the loader in place. This adjustability allows the loader to be mounted on almost any light duty truck.

Lifting the loader into place requires two people, and the loader itself has to be light enough that it won’t damage the tailgate. For this reason, the hanger attachment is only compatible with Billy Goat’s DL 12, 13 and 18 loaders.

Swing-Away Hitch

Cargo hitch racks are a great way to use a trailer hitch to expand cargo space on a truck or SUV. The swing-away hitch expands on this concept by making it easy to mount a debris loader while still having access to the truck bed. Billy Goat makes two versions of this hitch: one for a center-mounted hitch receiver, and one for stake body beds and trailers.

With the center-mounted hitch version, the loader is mounted on a swinging arm. When in use, the loader is directly behind the bed. When it’s time to unload, the arm swings out and locks at either 90 or 180 degrees away from the hitch, leaving the bed clear for dumping. The stake mount version has the same three arm positions, but the insert for the receiver is offset, allowing a receiver to be mounted out of the way on the far right side of the bed.

The swing-away hitch is compatible with DL 12, 13, 14 and 18 debris loaders.

Skid Mounting

A skid mount is essentially a metal pallet. By using one with your debris loader, you can move it using a fork or pallet jack, letting you put it on the vehicle that needs to collect leaves. Billy Goat’s skid mounts come with mounting holes, letting you permanently attach the loader to a surface, such as the front of a trailer. Skid mounts are available for all models.

CustomFit Trailer

This trailer is compatible with the DL 25 and 35, Billy Goat’s largest loaders. It comes with 14-inch wheels and pre-wired lights, allowing it to be used on the highway, while a traffic cone holder and backup whip make it easy to set up when you’re at the work site.

Reaching Your Bed or Trailer

If the stock discharge chute and intake hose don’t work for your setup, there are accessories you can add to change their positions:

360 Rotational Kit – This swivel joint is hand adjustable, letting you aim the exhaust chute where you need it. This makes it a great addition to trailer and skid-mounted loaders where the loader may not always be in the same position relative to the bed or trailer.

Extension Kit – Need a little more reach to get debris into a tall truck bed or trailer? This two-foot long tube fits between the impeller opening and the stock chute, extending its reach. The extension cannot be used at the same time as the rotation kit.

Length Extension – Need a way to get debris into a bed or trailer from a long distance? A 5-foot extension can be added to increase the chute’s reach, making it a perfect complement to the CustomFit trailer.

Discharge Hoses – There are two ways to extend the reach of the intake: replace the stock hose with a unit that extends 5 feet longer, or join two hoses together using a coupler.

Exhaust Deflector – The deflector covers the end of the chute, sending debris downward. Its angle can be adjusted to get debris exactly where you need it.

Set Up Your Debris Loader with Help from Billy Goat Parts

Billygoatparts.com is your source for everything Billy Goat. We’re a certified dealer for them and their manufacturing partners so we can ship parts and accessories for everything on your equipment to any address in the U.S. and Canada. Not quite sure what you need? Our search system lets you narrow down results by model and serial number and shows parts diagrams and factory descriptions so you can find the part that will fit your loader.

Posted in Uncategorized | Tagged , , | Leave a comment

When to Replace the Belt on Your Billy Goat

billygoat belt

How do you know when it’s time to replace the belt on your Billy Goat equipment? While the company does have recommendations based on operation time, there are a number of factors that can shorten its life. These tips will help you remedy issues that can lead to premature wear and get a new belt in place before the old one fails.

Why Does My Billy Goat have Belt Drive?

A shaft drive or direct drive system may seem like a more practical, lower maintenance solution, but there are a lot of advantages to using a belt drive, even if it requires a little more work to maintain.

By using a belt drive, the engine can be mounted away from the tool being driven. Self-propelled equipment is designed to drive the transmission directly via the engine shaft or a short belt, while blades can be driven by a longer belt. This places the engine directly over the drive axle for better traction.

When you engage the drive on your equipment, you’re moving a belt tensioner. This pulley pushes on the belt, increasing the area it needs to wrap around, and in turn pushes it down onto the drive pulleys, allowing power to be transferred between the engine and your equipment’s blades, brushes or drive system. Using this clutch system in place of a friction clutch reduces complexity and cost.

The belt also acts as a sacrificial part. If the tool gets jammed, the stress is taken out on the belt, stretching or breaking it instead of crushing the bearings or bending shafts, saving significant costs on repairs.

When is it Time to Replace a Belt?

If you see any of these signs, it’s time for a new belt:

  • Cracks are forming on the belt surface.
  • The belt has stretched to a point that the drive system can’t engage.
  • There’s abrasion along the belt surface, usually caused by misaligned parts in the drive system.

How Long Should a Belt Last?

For most equipment, Billy Goat recommends inspections every 25 hours of operation and replacement every 100-150 hours. Those inspection intervals are needed because there are a number of problems that can shorten belt life considerably:

If the spindle bearings begin to fail, the increase in friction can cause the belt to slip and pull, wearing and stretching it out prematurely. Some models have spindles that need to be greased periodically; before adding grease, clean the Zerk fitting to keep dirt from being pushed into the bearings. If you clean your equipment with a pressure washer, don’t spray the pulleys directly, since this can wash out the grease and promote surface rust.

Metal wire belt guides are used on some models to help keep the belt in position near the drive and idle pulleys. If these become bent, they can rub against the sides of the belt when it’s engaged.

If the belt isn’t engaging, it may be caused by a stretched or misadjusted clutch cable. Billy Goat recommends inspecting the cable every 50 hours, but it’s still worth checking if the blades or drive system aren’t working. The lever should move freely, and the cable should push the idle pulley far enough to remove any slack in the belt. Your owner’s manual will list the expected travel distance for the pulley as well as the force required to move the lever so you can make sure your equipment is within specifications.

What Can I Do to Make My Belts Last Longer?

Before you use your equipment, check the area for obstacles. When using a brushcutter in a new area, it’s a good idea to make a tall cut to reveal the ground, check for hidden objects like chains and rocks, then cut the grass and saplings down to the desired size. Impacts don’t just bend the blades and shafts, they also put a strain on the belt.

While the belts on most equipment are covered, the drive belt on the Grazor pavement cleaner is exposed, allowing it to be damaged by UV light. Keeping it under a cover can allow moisture to gather that will promote rust, so it’s best to store this equipment inside without a cover for the best protection.

When it’s time to store your equipment, keep it away from furnaces. When they heat up, they create ozone. This gas reacts with rubber, aging it prematurely.

Where Can I Get New Belts for My Billy Goat?

We are a certified Billy Goat dealer, so our belts are OEM parts designed specifically for your mower, brush cutter or pavement cleaner. Billygoatparts.com has built-in factory parts diagrams for new and old models, making it easy to identify what you need, whether you want to have a belt on hand to reduce downtime or need to replace a cable. We can ship what you need to any location in the U.S. and Canada.

Posted in Uncategorized | Tagged , , | Leave a comment

Are Grubs Causing Bald Patches on Your Lawn?

Are Grubs Causing Bald Patches on Your Lawn?

Is yellow, dried out grass showing up on your lawn? You might have a grub infestation. Here’s what you need to know to correctly identify this problem, what you can do to stop it, and steps you can take to keep it from happening in the future.

Identifying a Grub Infestation

In the summer, beetles lay eggs on the ground which hatch into the grubs. Through the late summer and fall, the grubs eat as much as they can so they can survive the winter. Once cold temperatures hit, they burrow 4-8 inches into the soil to hibernate, reawakening in the spring. Their feeding resumes at a slower pace until they emerge as adult beetles in early summer. A few grubs in your soil is no cause for alarm, but major infestations can cause serious turf damage.

The grubs’ fall feeding frenzy can do major damage to the root system of your turf, creating yellow patches of grass on the surface. If other causes like high amounts of shade or lack of water have been ruled out, it’s likely that the cause is a grub infestation. Severe infestations will make the soil spongy and eventually break the connection between the sod and soil, allowing it to be peeled back like a piece of carpet. High concentrations of grubs will also attract predators including skunks, moles, and crows.

Fall is the best time to stop the infestation since the heightened activity makes these adolescent insects more likely to venture close to the surface of the soil and consume biological and chemical agents. There are several methods that can be used to reduce the population and prevent future infestations.

Physically Killing Grubs with Your Aerator

You can’t step on a grub like you would a spider since they’re buried in the soil, but your aerator can punch through the top layer and through the insect inside. Your lawn should always be moist to make it easier for the tines to penetrate the soil, but if you want the maximum effect on grubs, watering should be done the day before aerating to force them into upper soil layers where the tines can more easily reach them.

Overseeding

Grubs and the beetles that lay them prefer sparse lawns. Overseeding your lawn can make it harder for beetles to find an egg laying spot, and make it harder for the grubs to move around. In the northern half of the U.S, having both warm and cool weather grasses can help maintain a thick lawn across the egg laying and feeding seasons.

Dethatching

A thatch layer thicker than ¾ inch can keep grub treatments from reaching the ground, and thick thatch can encourage beetles to lay eggs. If you have heavy thatch build-up, remove it with a power rake before applying pesticides or nematodes.

Nematodes

A nematode is a microscopic, smooth worm which lives in soil and eats plants and insects. Plant-eating nematodes are a major threat to crops, but beneficial varieties are available that will actively hunt grubs. Steinernema bacteriophora (Sb) and Heterorhabditis bacteriophora (Hb) varieties can be used to treat lawn pests, but for grubs, Hb is the most effective. These worms can burrow deep into soil and have a mouth designed to bite into grubs.

The nematodes should be stored in a refrigerator before use, and should only be applied when the temperature is between 48-93°F (9-34°C.) The worms will need to be mixed with water and applied to the lawn using either a watering can or a garden sprayer; there are several ways to pack nematodes, so check the instructions on the correct mixing procedure. Rinse the lawn after application to wash off any nematodes stuck on the grass, then keep the lawn moist for the next two weeks to help the worms dig into the soil.

Pesticides

Trichlorfon or carbaryl-based pesticide can be applied to kill off remaining grubs. These pesticides are usually in granular form and will require light watering to work them into the soil without running off the turf.

Make Sure Your Equipment is Ready to Fight Pests

Billy Goat’s overseeders and dethatchers are invaluable tools when fighting off grubs, but only if they’re running right. When you need parts to repair or maintain your Billy Goat equipment, visit www.billygoatparts.com. We’re a certified dealer for Billy Goat and their manufacturing partners so we can provide you with everything you need including engine parts. We ship across the U.S. and Canada.

Posted in Uncategorized | Tagged , , | Leave a comment

Cool Season Grasses: Keeping Your Lawn Green this Fall

cool season grasses

Want your lawn to look greener longer? Planting cool weather grasses can give your turf a second life, taking over as warm weather grasses become dormant. Not only do these plants grow in colder weather, they stay green when they’re in hibernation, keeping your lawn looking good through the winter.

What Makes Cool Weather Grass Different?

These grasses sprout when temperatures are 65 degrees or lower, so they start growing as warm weather grasses are heading toward dormancy, then come back earlier in the spring. Cool weather varieties don’t become dormant until temperatures get much lower, and when they do, they still tend to remain green. Planting these grasses can help keep your lawn looking good longer through the year, particularly in the colder climates found in the northern half of the U.S.

Selecting a Variety

There are several varieties of grass that fall into the cool weather category: Kentucky bluegrass, perennial rye and several types of fescues. Fescue has traditionally been divided into tall and fine types, but new turf-type tall varieties have blurred the line with traits of both tall and fine grasses.

Bluegrass is a creeping grass that uses runners like most warm season grasses. This makes it more prone to thatch buildup. It needs open sun and plenty of water to thrive, but it has a fine texture, giving it the best ground coverage.

Fescue and ryegrass are bunch grasses that spread from a crown. These grasses require a high mowing height to keep the blades from cutting into the crown, usually around 2.5-3 inches.

Tall fescue has deep roots, making it drought-resistant, while its thick leaves are wear-resistant, making it a great choice for high-traffic areas. Newer varieties are finer, providing better coverage for a more even finish. For the best looking lawn, look for a variety made for turf, not pasture.

Fine fescue doesn’t handle wear, but it can withstand dry, shaded areas as well and cold better than any other cool season grass.

Perennial ryegrass works well in moist soil that doesn’t experience extreme temperatures. It germinates quickly, but won’t last as long as other cool season grasses. The crowns are shorter than fescue so it can be mowed down to a height of 1.5-2.5 inches.

It’s common to find seed blends to get full lawn coverage over the longest time period. Ryegrass sprouts first followed by bluegrass, while tall fescue covers high traffic areas and fine fescue covers shaded areas while filling in around other varieties for higher density.

Seeding

The best time for seeding these grasses depending on the blend and your local climate; for the northern half of the U.S, the best time falls somewhere between early September and late October. Ryegrass can also be seeded in early fall in the southern half of the country to boost warm season grasses.

The seeds need to make contact with the soil to germinate. Aerate and dethatch the lawn before laying down seed; if you have an overseeder, make a pass without seeding to pull up the thatch layer. The grass should be cut no higher than two inches to ensure the seeds have maximum ground contact, and the soil needs to be moderately moist to keep the seeds stick to the surface.

The seed producer will have a recommended density for the seed you purchased. With a Billy Goat overseeder, getting the right drop rate is simply a matter of setting the lever on the hopper.

Getting the Grass to Grow

The soil needs to stay moist for the grass to germinate. To maintain moisture, lightly sprinkle water on the lawn several times a day instead of watering all at once. The existing grass should provide enough coverage to protect the new seeds, but bare soil should be raked lightly to cover the seeds.

Seeding should coincide with fall fertilizing. Re-balance the minerals based on the results of a soil test, keeping in mind that new seeds need phosphorus near the surface for optimum growth. While other minerals will leach through the soil, phosphorus stays put, so it needs to be within reach of new, shallow roots.

Get Your Billy Goat Equipment Ready for Fall Lawn Care

From overseeders to aerators, if it’s Billy Goat, you can get parts for it at www.billygoatparts.com. We’re not just a Billy Goat dealer, we’re also a certified dealer for Kohler, Honda, and Briggs & Stratton, so we can supply you with parts for both your equipment and the motors that power them. We ship across the U.S. and Canada.

Posted in Uncategorized | Tagged , , | Leave a comment

Billy Goat Outback Brushcutters

brushcutter

Fall is coming, and that means it’s time to define landscaping, get rid of overgrown vegetation and clean out gutters before the first snows. Billy Goat has three brushcutter models that can get these jobs done quickly, but they each have their own advantages for certain tasks. Which one is right for you?

Deck Size and Design

Both the fixed and pivoting deck BC26’s and the BC26HHEU use a 26-inch wide deck, so the cutting width limitations are mostly down to engine power and the thickness of the grass. Cutting height for the BC26 is fixed at 3.75 inches, letting it slice tall grass and weeds to a point that they can be handled by a mower. The BC26HHEU’s deck can be adjusted to a height as low as 1.77 inches. In lighter growth, the cut can be low enough to eliminate the need to mow, although it’s still a good idea to make a high pass first to make obstacles like rocks and branches visible.

A fixed deck is the most stable, making it a great choice for rough terrain, thick vegetation, and steep angles. A pivoting deck can follow the contours of the surface, so it leaves a cleaner finish. The BC26HHEU’s deck is auto-leveling, providing the most even cut among these models.

Engine

Power output is nearly the same for the Honda and Briggs & Stratton engines, but the Honda engines have a lower center of gravity, letting it handle slopes up to 20 degrees versus 15 for the B&S. Billy Goat also offers the Honda with the option of electric start, and the motor is backed by a three-year warranty, while the Briggs & Stratton motor is covered for two years.

Drivetrain

The geared transmission in the BC26 has three speeds and reverse, and since the transmission and axle are a single unit, there aren’t any joints or linkages that can get caught on vegetation.

The Tuff Torq transaxle in the BC26HHEU is hydrostatic, allowing full speed adjustment while keeping the engine at maximum throttle to maintain speed to power the cutting system. It also comes with what Billy Goat called “Enhanced Traction Control,” which is essentially a limited slip differential. Normally, the wheels can spin at different rates for making turns, but if one wheel starts to slip, both axles lock for more grip. For even greater stability, the caster wheels can be locked in place to keep the brushcutter tracking straight.

Which Brushcutter is Right for Me?

If you want the ultimate in performance, the BC26HHEU is the way to go. Its features make it flexible enough to handle both steep angles and flat ground, while a self-propulsion system and the option of electric start make it easy to use.

Don’t need all the features of the top-of-the-line Billy Goat? The pivoting deck BC26 is great for gentle slopes and flat areas, while the fixed deck model is the best choice if you need to regularly tackle gutters.

Opting for a Honda engine provides a better warranty and more stability, but if you know your brushcutter will only be used occasionally and you aren’t as worried about steep surfaces, the Briggs & Stratton is a solid, inexpensive option.

Getting Parts for Your Billy Goat Brushcutter

Billygoatparts.com isn’t just a Billy Goat dealer, we’re also a dealer for Honda and Briggs & Stratton, so we can supply you with replacements for everything on your equipment from spark plugs to spindles, no matter where you are in the U.S. or Canada. Finding the right part is easy, too, thanks to our advanced search engine that has built-in factory parts diagrams and descriptions to help you identify what you need.

Posted in Uncategorized | Tagged , , | Leave a comment

Getting Your Truck Loader Ready for the Fall

Billy Goat Debris LoaderYour Billy Goat debris loader may have seen some occasional use picking up grass clippings, but most owners don’t really put their equipment to work until the start of fall. Here’s what you need to know to get your loader up and running for the leaf season.

Mounting and Safety

Billy Goat’s debris loaders are not balanced in a way that lets them operate while free standing. The loader needs to be mounted onto a skid plate, hung from a tailgate or attached to a trailer or hitch mount before the engine is started.

Fuel

Fuel should be used within one month of purchase, or within three months of purchase after being treated with a stabilizer. If there is still old fuel inside the tank or carburetor, it should be drained according to the manufacturer’s directions.

Oil

The oil should be changed before putting the engine in storage. If you don’t know if it was changed, it’s a good idea to do so now to protect the engine from oil degradation. If you know the oil is fresh, the level should be checked to ensure there haven’t been any leaks. Honda engines come equipped with the company’s Oil Alert system, which will cut power to the ignition if the oil level is too low.

Some manufacturers recommend adding a small amount of oil to the inside of the combustion chamber before storage. It’s normal for the engine to smoke a little while after it’s first started as this oil is burnt off.

Battery

Electric start models come equipped with a small battery. Any corrosion on the battery terminals should be cleaned off with a wire brush, and the strap securing the battery to the tray should be checked for tightness. When measured with a multimeter, the terminals of the battery should read between 12 and 13.2 volts.

Billy Goat recommends using a trickle charger if the loader will be used for less than 45 minutes between starts; a dead or low charge battery can’t be recharged by the engine after starting it with the recoil starter. If the battery is low and needs a full recharge, the charge output should be limited to a maximum of two amps.

If the battery needs to be replaced, mount it in the tray so that the positive terminal is on the side closest to the impeller housing.

Intake Hose and Impeller

The hose should be stored by disconnecting it from the loader and laying it out flat. If it wasn’t, kinks may have developed that will keep the hose from moving smoothly or from sealing around the impeller opening. If this has happened or you find holes in the hose, it should be replaced.

Before attaching the hose, disconnect the wires from the spark plugs to prevent an accidental start and inspect the impeller and remove any debris still left inside. Even if the housing was cleaned before being stored, there’s always a chance that squirrels and other small animals have left behind nut shells and other debris that could clog the housing.

The hose should be stretched out before clamping it onto the impeller opening with the hose band. When clamping, make sure the coupler goes over the lever that controls the interlock switch, located at the top of the intake opening. Once attached, line up the boom with the hose and attach the hose band over the hose at its natural resting point.

During the season, the hose should be occasionally remounted in a new position. This helps spread wear across the entire hose, increasing its life span.

Exhaust Chute

The direction and distance debris is ejected from the loader is controlled by the position of the exhaust elbow. When mounting the loader onto a truck or trailer, this elbow should be positioned so that it deposits debris toward the back of the cargo area. Never stand below the exhaust elbow when adjusting the angle: it may be a hollow tube, but it’s very heavy. If you plan on moving the loader between vehicles or trailers through the season, it’s a good idea to install a swiveling chute or an exhaust hose so that the direction of the debris can be changed to work with the loader’s current location.

Sourcing Replacement Parts and Accessories

Need a new hose or want to add an extension to your loader’s chute? Billygoatparts.com is a certified dealer for Billy Goat as well as Briggs & Stratton, Honda and Subaru, so we carry everything you need to get your equipment ready for the season. Finding the right parts is easy thanks to an advanced search engine with built-in factory diagrams, and we can ship those parts to any address in the U.S. and Canada.

Posted in Uncategorized | Tagged , , | Leave a comment

How to Clean Concrete with a Pressure Washer

A Billy Goat pressure washer can get the toughest dirt and stains off of sidewalks and driveways to make them look brand new, and it can also get the surface clean enough to ensure sealants can bond properly to protect your pavement through the winter. These tips will take you through the entire process to help you get the best results when cleaning concrete while minimizing damage to your home, your pressure washer, and the environment.

Preparing to Pressure Wash: Detergent, Waste Collection, and Sealant

Only use detergents designed specifically for pressure washers: muriatic acid may be popular for manually cleaning concrete, but this corrosive substance will eat through the seals and metals used to construct your equipment. Detergents designed for degreasing work best since they can remove oil stains that can’t be lifted by the water spray, but these can damage asphalt since it’s made from oil. Check the label to make sure it’s compatible with the surface you need to clean.

Depending on your local laws, you may need to take some extra steps to ensure you’re disposing of liquid waste properly. In most areas, it’s fine to use a biodegradable detergent and let it run off into storm drains, while other areas require that all waste be collected or diverted from storm drains to keep them from entering waterways. For small scale cleaning, you may only need to use a cover or berm on the closest storm drain.

There’s no better time to seal the surface of cement than after everything has been cleaned. The surface needs to be dry before application, so if you plan on doing everything in one day, make sure the pavement is pressure washed early morning and any standing water is wiped off with a squeegee to allow maximum evaporation.

Protecting Walls, Windows, and Doors

Plastic sheeting such as a drop cloth or moisture barrier should be hung over windows, doors and adjacent walls using painter’s tape to protect them from debris and accidental contact with the pressure washer’s spray.

Sweep off the Area to Be Cleaned

Leaves, grass clippings, and other loose debris should be swept off first to reduce the waste removed and the time required for pressure washing.

Spraying for Mechanical Removal of Dirt

If the surface is heavily soiled, start by removing the dirt physically through the use of the washer’s high-pressure spray. For the best results, use a 25-degree tip and keep the end of the wand 6-8 inches away from the pavement surface. For stubborn areas such as dried paint, the tip can be used 3-4 inches from the surface. Spraying directly at cracks may cause them to expand: start spraying away from the crack before moving the want over the area. Wait until the detergent has been applied before tackling stains from grease and oil.

Applying the Detergent

Switch to the soap nozzle and use the detergent hose to draw from a container filled with the concrete detergent. With the tip 6-8 inches from the surface, give the area an even coating of soap. Most detergents have a recommended dwell time to let the detergent work on the surface, typically around 5 minutes. Once this time has passed, the pavement can be rinsed.

Rinsing

Now that the oil has bonded to the detergent, it should lift off easily with a spray from the pressure washer. Like the initial cleaning, it’s best to use a 25-degree nozzle 6-8 inches from the surface.

Sealing

Now that the surface is clean, it’s simply a matter of waiting for the surface to dry before applying a sealant. Trying to seal the pavement while it’s still damp will keep the sealant from bonding, resulting in light colored streaking.

Getting Parts for Your Billy Goat Pressure Washer

Billygoatparts.com isn’t just a certified Billy Goat dealer, we’re also a dealer for the pump and engine manufacturers Billy Goat partners with to build their pressure washers. We stock OEM parts for your equipment, and we even have factory parts diagrams and descriptions built into our site to make it easy to find the parts you need. We can even ship your order to any location in the U.S. or Canada.

Posted in Uncategorized | Tagged , , | Leave a comment