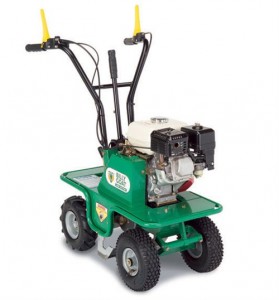
 The SC121H may be simple, but this small, lightweight device can cut sod into easy-to-remove strips just as well as larger, more complicated machines. Here’s how you can get this sod cutter up and running, and keep it performing at its best.
Assembly
Insert the handlebar into the two supports between the height adjustment lever and the gear lever selector. The handlebar has multiple holes, letting you choose the mounting position to get a comfortable operating height. Use two of the included screws to secure the handlebar to the supports.
Fit the end of the cutting height adjustment lever onto the end of the support. The hole in the lever needs to face the back of the machine to line up with the hole in the support. Install one of the provided screws in the hole.
The engine is shipped without oil. Add oil to the crankcase according to the directions in the included engine manual.
Tire Pressure
Check the pressure regularly to ensure the machine roles easily; the recommended pressure is listed on the sidewall. If one of the tires gets low, it can cause the cutter to drift to one side during operation.
Sod Cutting Blade
The sod blade is sharp, and should only be handled when wearing heavy gloves. Make sure the engine is off and the spark plug is disconnected before inspecting or replacing the blade.
To inspect the blade, raise it to the maximum cutting height. If the blade is worn, cracked or bent, it needs to be replaced, even if it’s intact. It’s made from brittle steel to deliver a sharp edge, and that means it can shatter with significant force once damaged. The blade screws and nuts are also subject to wear and need to be replaced along with the blade.
To replace the blade, remove the screws and nuts holding it onto the machine. There are two screws on each side where it attaches to the lift assembly.
Cable Adjustment
Before adjusting the cables, place the machine on a flat, level surface, shut off the engine, and disconnect the spark plug.
For both the forward control cable and blade control cable, there should be no play between the upper end of the cable and the adjustment screw on the end of the lever. Turn the adjuster to take up the slack. If the slack can’t be removed with the adjuster, the belt is too loose and needs to be adjusted or replaced.
The service brake cable should have 2-3 mm of play when the lever is released. Squeeze the lever and make sure the brake pad contacts the drive pulley.
Belt Replacement
To access the belts, remove the guard by unscrewing the bolt on the bottom of the frame between the right side wheels and the bolt on the front of the cover.
Blade Belt
1. Disconnect the connecting rod by removing the nut and screw securing it to the arm.
2. Slide off the belt by turning the lower pulley counter-clockwise.
3. Install the new belt in reverse order.
Forward Control Belt
1. Remove the blade control belt (see above.)
2. Remove the blade (see above.)
3. Remove the forward control belt by spinning the lower pulley counter-clockwise.
4. Install the new belt in reverse order.
Checking Belt Tension
Check the belt position by operating the related control lever. With the handle closed, there should be 2 mm of space between the belt and the belt guides. Next, disconnect the spark plug wire. Pull lightly on the starter handle. If the belt is set up correctly, the drive pulley will spin without moving the belt. If the belt moves, slide the engine back slightly.
Transmission Oil
Change the oil after the first 20 hours of use, then every 100 hours thereafter. Billy Goat recommends SAE 90 transmission oil.
To check the oil, remove the oil fill screw on the back of the transmission. If oil doesn’t leak out, remove the fill cap bolt on top of the transmission and add oil through this hole.
To change the oil, remove the fill plug bolt and oil fill screw. Place a drain pan under the transmission and remove the drain plug, located on the left side of the transmission case. Once the transmission is empty, reinstall the drain plug and add oil through the fill hole until the oil drips out of the fill screw hole. Reinstall the screw and fill bolt.
Get the Parts You Need
Billygoatparts.com is a certified Billy Goat and Honda Engines dealer. That means we can ship parts for the SC121H and the GX 160 that powers it straight to your door, whether you live in the United States or Canada. Finding parts is easy, too: just select your model and serial number, and our search engine will show you parts and accessories compatible with your machine as well as factory diagrams and descriptions.
