Clearing Brush in the Winter

BC2600 Hydro Series BrushcuttersWinter temperatures put plants into hibernation, which makes this the perfect time to use your Billy Goat brushcutter to tackle major land clearing projects. With the foliage gone, thick growth is easy to cut through, and there’s less chance of plant and soil damage. However, the cold also brings its own issues. These tips will help you make winter land clearing easier while managing problems associated with winter weather.

Why Should I Cut Brush in Winter?

Growth conditions are perfect for cutting. Annual plants have died off, while perennials are in hibernation. This makes it harder to damage the plants you want to keep. You also don’t have to deal with foliage as you slice through branches, and you won’t spread the seeds of undesirable plants.

There’s less precipitation in winter, which means areas that are usually muddy will be solid. This also reduces runoff, so there’s less soil disturbance. Taking care of land clearing now will make it easier to do finish mowing and planting next spring.

Like any project, there are bound to be some surprises that will interfere with your schedule. Doing brush clearing and landscaping projects gives you some extra time to work out issues before the spring rush. Since the plants aren’t growing, you have time to remove obstacles uncovered by brushcutting, including rocks and tree stumps. The landscaping industry in its off-season now, making it easier to schedule work you can’t do yourself, like tree removal.

Ideally, brush should be turned into compost or mulch to return nutrients to the soil. However, if you must burn, winter is usually the lowest risk time to do it. Cold temperatures and a lack of foliage makes plants harder to ignite.

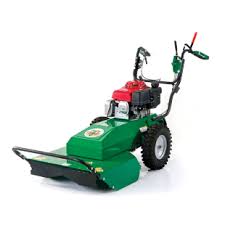
Preparing Your Outback Brushcutter for Winter Use

Fresh fuel is more important now than ever, as fuel formulations change to ignite easily in cold weather. Try to use new fuel as frequently as possible in your machine to make starting easier.

Using the correct oil reduces engine wear and makes your Outback brushcutter easier to start. Honda recommends using 5W-30 or 10W-30 in the GX series when temperatures dip below 50°F.

Always check your brushcutter’s tire pressure before use. Fluctuating winter temperatures can cause tire pressure to drop, making the machine harder to move. Low air pressure can also cause the tire to roll off of the rim.

It may take two or three minutes to warm up the engine in colder temperatures. Open the choke slowly, pausing to let the idle smooth out. Don’t use your brushcutter until the engine will idle with the choke open.

Planning and Preparing For Your Brush Clearing Project

Undergrowth can hide all kinds of dangerous trash and obstacles including hidden rocks, bottles, chain and fence wire. Inspect the area and remove obstacles that may damage your machine or turn into projectiles.

You won’t be able to use your Outback on snowy ground, and you might not want to use it immediately after, either. Runoff can make the ground muddy, making it easy to slip while you’re cutting.

Working outside increases your exposure to the elements. Choose tight-fitting clothing that adds insulation and completely covers your skin. Add or subtract layers to keep yourself warm without sweating. Sweat will limit the effectiveness of insulating layers and can turn cold, making it hard for your body to maintain its temperature. As always, you should wear non-slip boots, eye protection and ear protection when using your brushcuttter.

Limit land clearing to daylight hours. The less you can see, the more likely it is that you’ll hit an obstacle, damaging your machine and possibly hurting yourself.

Get Everything You Need for Your Billy Goat Straight from Your Browser

While most lawn care shops shut down for the winter, www.billygoatparts.com is always open. We’re a certified dealer, offering OEM parts and accessories for everything from the brand, new or old. Check out our parts sections to get common replacement parts, or use our search engine to see everything we offer for your model. We can ship your order to any address in the U.S. or Canada.

Posted in Uncategorized | Tagged , , | Leave a comment

Winter Checklist: Getting Your Billy Goat Ready for Storage

Is it time to put up your Billy Goat equipment for the winter? Taking a few steps now will prevent problems with rust, stale fuel, dead batteries and more. Here’s everything you need to do to make sure your equipment is ready to use next spring, whether you have a small pavement crack cleaner or the biggest stand on blower.

Cleaning

Start by cutting away any grass wrapped around axles and output shafts. These can cause binding and will wear down rotating surfaces.

Never use a pressure washer on your equipment, and never use water on the engine. This can force water inside the engine where it will contaminate the oil. When cleaning the engine, use a rag, a stiff brush or compressed air to remove any dirt buildup. Now might be a good time to remove the shroud from the engine and to a thorough wipe down of the cooling fins. The rest of your equipment can be cleaned with soap and water.

Does your engine have a spark arrestor? Remove carbon buildup by scrubbing it down with a wire brush. On Honda engines, you will need to remove the muffler cover to reach the spark arrestor. On Subaru and Briggs and Stratton engines, you only need to remove the screws holding the arrestor inside the tailpipe.

Fuel

If you leave fuel in your Billy Goat’s engine, it’s going to break down, even if it was treated with a stabilizer. Draining the fuel system now will save you the headache of cleaning it out next spring.

Honda GX series engines have a removable float bowl on the base of the carburetor. To drain the fuel system, shut off the fuel valve and unscrew the bowl. Place a container beneath the carburetor and open the fuel valve. Be sure to clean the bowl and refit the O-ring before installing it on the carburetor.

For all other engines, disconnect the fuel line to the carburetor and let the gas flow into a suitable container. Reconnect the line.

Once the fuel tank and lines are empty, start the engine. Let it run until it stalls to remove any remaining gas inside the carburetor or injectors.

Oil

Combustion can leave acids in motor oil. Changing the oil now before storage will prevent these acids from damaging your engine. Oil weight recommendations for winter temperatures can be ignored as long as you don’t start the engine while in storage.

Lubrication and Rust Prevention

Lubrication doesn’t just reduce wear and friction, it creates a physical barrier between your equipment and water. This keeps parts from rusting during storage.

Apply new grease to bearings after washing your equipment. Otherwise, you may end up washing away some of this lubricant. Billy Goat recommends NLGI #2 lithium grease. You can use general-purpose, marine and automotive greases that meet this specification.

Apply spray oil or silicone lubricant to the inside of cable liners. Spray the lubricant in one end of the liner until you see the lube drip out of the other end. Use a fogging oil or silicone lubricant to coat exposed metal parts of your equipment.

To keep the piston rings from seizing, engine manufacturers recommend applying motor oil to the cylinder walls. Remove the spark plug, then put a few drops of oil in the plug hole. Place a rag in front of the hole. Turn the engine over a couple times to circulate the oil. Any excess will be pushed out of the plug hole and onto the rag. Reinstall the plug.

If you have a pressure washer, fill it with antifreeze designed for your machine’s pump. This prevents freezing and keeps the seals lubricated.

Tires

Air up each tire to the maximum pressure indicated on the sidewall. This will help keep the tires from going flat and rolling off the wheel rims.

Battery

If you have an electric start debris loader or blower, disconnect the battery and clean the terminals. Connect the battery to a trickle charger to keep the cells from discharging and crystallizing.

Storage

From sod cutters to augers, your equipment needs to be stored in a covered area for protection. Never cover your equipment in a tarp. This will trap moisture, encouraging rust formation.

Even with an empty fuel system, there may be enough gas fumes coming off your equipment to start a fire. Keep your Billy Goat away from sources of sparks and open flame, including heaters and power tools.

Get Your Equipment Ready to Work Before You Need It

Now is the perfect time to do maintenance and repairs done on your Billy Goat equipment. No matter what you need, you can get it from www.billygoatparts.com. We’re not just a Billy Goat dealer, we’re also an authorized dealer for Honda Engines, Briggs & Stratton, Subaru Power, Tuff Torq, and Billy Goat’s other manufacturing partners. That means we carry the parts and accessories you need. We can ship your order to any address in the U.S. or Canada.

Posted in Uncategorized | Tagged , , | Leave a comment

Using Your Auger in Winter: Dealing with Frost Heaves, Frozen Ground and Ice

Winter can either be a great chance to catch up on fence maintenance or a frustrating time to make repairs depending on your location. Frost heaves can push structures out of the ground, and frozen soil can make digging difficult. Need a break? There’s always ice fishing. Whatever your plans, these tips will help you get the most out of your AGR1300H landscape auger this season.

How the Frost Line Affects Underground Construction

Soil is an insulator. That means if you dig a deep enough hole, you’ll find the soil is as warm as the area’s yearly average temperature, no matter the outside temperature. This limits the formation of ice to the “frost line.”

If you’ve had a cold snap and your fence posts or footings are popping out of the ground, it’s due to frost heaves. As the water in the soil freezes, it puts pressure on the holes, pushing up on anything inside them. This is compounded by “lenses,” small pockets of frost that form inside the soil. These force the soil upwards and can latch onto objects, increasing upward pressure from surrounding soil. While a frost heave may only move the soil by an inch over several days, the force it exerts can be tens of thousands of pounds per square inch. Once the ice melts, the object will settle in a slightly different place. This can make fences collapse and cause foundations to shift and crack. To stop this from happening, the object needs to be anchored below the frost line or have good surrounding drainage. This prevents lenses from forming underneath the object and lifting it up.

Unless you live in southern Florida or within sight of the Pacific Ocean, at least part of the ground can freeze during the winter. In the area near our shop, water can freeze anywhere from 30 to 40 inches deep. In parts of Canada and northern Maine, Minnesota and North Dakota, the frost line is over 100 inches deep. Soil conditions, construction and pavement can alter the frost depth locally.

Breaking Through Frozen Ground

Frozen soil is hard to cut through. Fortunately, the ground doesn’t just freeze down to the frost line when winter rolls around. If you time your work to coincide with a warm front, you can reduce the amount of frozen soil you have to break through. The National Weather Service’s frost depth reports will give you an idea of how deep you’ll have to dig before you hit soft soil.

How do you break through the frozen layer? Pushing on the auger bit can help, but not as much as some people claim. You probably won’t be able to put enough pressure on your Billy Goat post hole digger to cut through the ice. Even if you use a tractor or skid steer-mounted auger and support the entire vehicle’s weight on the bit, it will only dig a few inches before stalling.

If you’re cutting through frost, doesn’t it make sense to use an ice bit? Sure, it can cut through ice with ease, but it won’t be able to handle the soil. The bit can break easily when it strikes rocks, and there’s a chance it will break the receiver on your auger.

Your best option is brute force. A pickax works great for removing shallow layers of frozen soil, while you’ll want to use a jackhammer for thick frost layers. Once you’re past the ice, you can use your auger as you would during the summer. Remember that even frozen soil acts as an insulator. If you remove the frost and come back the next day to finish digging, the soil in the hole will be frozen. Instead of chipping away at ice and then drilling holes, concentrate on completing holes one at a time.

Cutting Through Ice

Is the AGR1300H overkill for ice fishing? Probably. However, it’s also a far faster, easier way to cut holes than standard ice augers. All you need is an ice bit. The Z link keeps the bit running true. This keeps the bit from making lips and uneven surfaces that fish can push against when you’re pulling up your line.

Once the bit goes through the ice, increase the auger speed and move the bit up and down. This will pull up slush and debris, giving you a clean hole to fish from.

Get the Parts and Accessories You Need for Your Billy Goat

When you need something for your Billy Goat, visit www.billygoatparts.com. We carry the full line of OEM parts and accessories for your equipment, including bits and adapters for the new AGR1300H landscaping auger. Our site has sections for commonly needed parts, including hardware, wheels and engine parts. Need something specific? Our search engine can show you factory diagrams and information specific to your model. We ship across the United States and Canada.

Posted in Uncategorized | Tagged , , | Leave a comment

Tips, Tricks and Answers to Common Questions for Repairing Your Billy Goat Equipment

lawn care clean upIf you’re here, you’re probably trying to figure out the best way to fix your Billy Goat equipment, whether you have a leaf blower, debris loader, sod cutter, power rake, aerator or brush cutter. In fact, there’s a good chance that the problem you’re trying to solve is common. Here’s how you can address these issues and make it easier to perform repairs.

What Tools Do I Need to Fix My Equipment?

Billy Goat uses SAE fasteners on their equipment, while engine and transmission manufacturers use either metric or a combination of metric and SAE fasteners. You can complete most repairs with a set of wrenches, sockets and a ratchet. A torque wrench is needed to tighten down some parts including impeller bolts, spark plugs, tines and brush cutter blades. In a few rare cases, you may need a jack and a set of woodblocks to lift the wheels or access the underside of your machine.

Can I Change the Oil Less Often if I Use Synthetic?

No. Even on engines with oil filters, there’s a limit to how much dirt the oil can absorb before it needs to be changed. However, synthetic oils do burn less, and they work over a wider temperature range.

Why is My Fuel System Clogged?

Stale fuel is the number one cause of starting issues in modern small engines. Ethanol gets a lot of the blame for fuel problems, but most owners don’t realize that all fuel formulas have changed. Modern “pure” gasoline ages quickly, leaving behind waxes and varnish that will clog your engine’s fuel system.

It really doesn’t matter if you use pure gasoline or E10 as long as it’s fresh. Fuel should be used within a month of purchase. If you add a stabilizer, it should be used within three months. If you’re having starting problems with stale fuel, drain it your engine’s fuel system and replaced it with fresh fuel. EFI engines are less sensitive to stale fuel, but Vanguard makes the same recommends for their fuel-injected engines.

If the fuel system becomes clogged, you can usually clear out the carburetor and fuel lines by spraying them with a carburetor cleaner.

How Do I Get My Aerator’s Tines to Last Longer?

Both core and spike tines are made of self-scouring metal. While impacts with rocks will blunt the edges, the tines will resharpen themselves after a few passes. However, bent tines still need to be replaced.

Always wash the tines after use. Keeping them clean will prevent rust. Dried-on dirt also makes it hard for soil to push through the tines, reducing performance and keeping the tines from sharpening themselves.

My Equipment’s Hydrostatic Transmission Hesitates. Is it Failing?

Hesitation is almost always caused by problems with the controls, not the transmission itself. Usually, it just takes a small adjustment to get everything working again.

Walk-behind models use a cable-operated system to engage the transmission. Over time, these cables can stretch, preventing you from opening the transmission valves fully when using the control levers. Check the handle and the base of the unit for a cable adjuster. Loosen the lock nut, then spin the adjuster in or out to adjust tension. If the cable stretches out too much, it must be replaced.

Stand-on leaf blowers have adjustable valves connected to the control levers. Check your owner’s manual or the article on Hurricane blower maintenance on this site for adjustment instructions.

How Do I Sharpen a Brush Cutter Blade?

Billy Goat uses flat blades on their Outback brush cutters. These are similar to lawnmower blades and should be treated the same way. Using a mill bastard file or a grinding wheel, take off metal at a 45-degree angle until you have a flat surface that’s as sharp as a butter knife. If there are cracks or bends in the blade, replace it.

After sharpening, the blade needs to be balanced. If you don’t have a blade balancer, hang the blade from a nail. If one side points down, file a little metal off of it. Recheck the balance and file more metal as necessary. Once the blade sits horizontally on the nail, it’s balanced.

Is There Any Way to Speed Up Drying after Washing a Vacuum Bag?

No. The bag must be air-dried to protect the fabric. Instead, consider picking up an extra bag for your lawn or hard surface vacuum. That way you can have one bag ready to use while the other one is drying.

Where Can I Get Quality Parts?

Billygoatparts.com is an authorized dealer for Billy Goat and every manufacturer they work with including Honda Engines, Briggs & Stratton, Vanguard, AR Pumps, CAT Pumps, and Tuff Torq. That means you can get all the parts and accessories you need for your Billy Goat from one place. Our site can show you parts listings and factory diagrams for your specific equipment, so you can be sure you’re ordering exactly what you need. We ship across the United States and Canada.

Posted in Uncategorized | Tagged , | Leave a comment

Using a Torque Wrench when Repairing Your Billy Goat Equipment

Using a Torque Wrench when Repairing Your Billy Goat EquipmentWhen you’re working on your Billy Goat equipment, you’ve probably come across the instruction to “torque to X ft-lbs.” What does setting the torque of a bolt or nut do? Is it safe to skip this and just tighten things down by hand? Do you really need to replace some bolts after they’re used? Here’s what you need to know to make sure spark plugs, fasteners and filters on your equipment are installed correctly.

Why Do So Many Parts Have Torque Specifications These Days?

Most DIY-ers either under tighten or overtighten bolts, leading to thread damage and parts failure. While torque specs used to be limited to critical components like engine head bolts, engineers are applying them to areas where damage from over- or under-tightening is likely. Pulling the spark plug threads out of your engine is expensive. Having the blade fly out of your brush cutter can seriously injure you.

Choosing a Torque Wrench

There are three designs on the market, but only two of these are good options when working on your equipment.

Beam-style wrenches have a gauge next to the handle and a long pointer attached to the wrench head. As you tighten the bolt, the handle flexes, moving the pointer left or right in relation to the handle. By matching the end of the pointer with the gauge, you can see how much torque you’re applying. While these are cheap, they’re difficult to read when working on anything that isn’t pointing straight up.

Clicker torque wrenches have a spring inside the handle. Twisting the handle adjusts the tension on the spring. When you reach the desired torque, the spring moves a level inside the wrench, making a clicking sound. They don’t cost much more than beam wrenches, and they’re much easier to use.

A digital torque wrench uses sensors to measure flex. Once the desired torque is reached, it makes a beep. Most models have a display that shows the current torque. Digital torque adapters use the same measurement system, but they can be used with any ratchet wrench.

Mechanical torque wrenches are only accurate above 20% of their usable range, and electronic wrenches above 10%. That means you won’t be able to accurately torque a spark plug with the same wrench you use for larger components.

Using Your Torque Wrench

Do not use lubricant unless instructed to do so. This will keep the bolt from tightening properly. That includes spark plugs. Unlike old plugs, the threads on modern plugs are machined to prevent them from seizing in the head.

First, use a regular wrench to screw down the component until it seats.

Set the torque wrench to half the recommended torque. Tighten the bolt, nut or spark plug. If you’re putting a wheel on your stand-on blower, work in a star pattern. After you tighten a nut, move to the nut on the opposite side.

Set the torque wrench to the full recommended torque. Tighten the bolt, nut or spark plug. Again, use a star pattern when bolting on a wheel.

Caring for Your Torque Wrench

A torque wrench is a precision instrument. If you drop your torque wrench, it needs to be recalibrated. Just one shock can throw measurements off by as much as 30%. Always store the wrench in its case. If you have a clicker wrench, set the torque to “0” when storing to release tension on the spring.

Why Do I Need to Replace Some Bolts After They’re Removed?

These are “stretch” bolts. They have metal that is formulated to handle severe shocks, stress, and heat. However, this also means they permanently stretch when they’re torqued down. If they’re reused, they won’t be as tight, leading to failure. If a standard bolt is used, it will eventually break from stress.

Torque Settings for Your Billy Goat Equipment

This list is current as of the writing of this article. Always check your manual before tightening down parts of your equipment.

Debris Loader Impeller Bolts
DL14 and DL18 – 33-38 ft-lbs.
DL25 – 60 ft-lbs.
DL35, DL37, and DL39 – 175-180 ft-lbs.

BC2600 Hydro Brush Cutter blade – 30-40 ft-lbs.
PL2501 Hydro-Drive Aerator tines – 100 ft-lbs.
AET Series towable aerator tines – 100 ft-lbs.
Overseeder blade assembly end nut – 120 ft-lbs.

Hurricane Ride-On Blower transaxle filter – 180 in-lbs. (15 ft-lbs.)
Hurricane Ride-On Blower wheel lug nuts – 75 ft-lbs.

Briggs & Stratton and Vanguard spark plugs – 180 in-lbs. (15 ft-lbs.)

Need Parts for Your Billy Goat?

Billygoatparts.com is an authorized dealer for Billy Goat and their manufacturing partners.
That means we have new impeller bolts, spark plugs and everything else for your equipment. Our site has sections for frequently ordered parts, and our search engine can find parts and accessories that fit your model. When you look up a part, you’ll see factory parts diagrams, so you can match what you’re ordering to the part on your machine. We ship across the United States and Canada.

Posted in Uncategorized | Tagged , , | Leave a comment

Disposing and Using Leaves

Disposing and Using LeavesAny way you look at it, fall leaves are a major hurdle in lawn care. Disposal can be expensive, and removing leaves strips the soil of nutrients. However, by putting a few practices in place, you can reduce your disposal and fertilizer needs, saving you time and money.

Why Leaf Disposal is Important

There are several reasons you need to remove or break down leaves to protect your lawn:

– Leaves create a mat that blocks light and air while slowing drainage. This can kill grass directly, or prevent it from storing enough food to survive the winter.

– Most grasses thrive in soil with a pH between 6 and 7. Freshly fallen leaves can have a pH below 6, exposing the grass to acidic conditions. This hampers grass growth and increases the growth of acid-loving weeds until the leaves decompose and return to a neutral pH level.

– Plants like black walnut and hickory produce a natural herbicide that affects a wide range of plants. This becomes a problem when their leaves cover the ground.

Simply picking up and throwing out leaves isn’t the best solution. 50% to 80% of a tree’s nutrients end up in the leaves. Removing them strips these nutrients from the soil, increasing the need for lawn fertilizer. However, leaves can be reincorporated by aiding decomposition on the ground or composting them into mulch.

Leaving Leaves on the Ground

Smaller leaf parts decompose faster than large ones. A mulching mower can break up leaves into smaller pieces. However, during peak season, the leaves may need to be broken up two or three times per week. A better strategy is to use a Billy Goat lawn vacuum or debris loader. Leaves that pass through these machines are chopped up by the impeller. This speeds up decomposition and lets you return the leaves to the ground when the soil can handle them.

Black walnut, butternut, hickory, and English walnut produce the allelochemicals juglone and hydrojuglone. These are natural herbicides that kill off competing plants. Poisoned plants will turn brown and wilt, especially when stressed by extreme temperatures. Leaves from these plants should be removed from lawns to prevent damage.

Composting

Leaf disposal facilities are set up to compost collected leaves, but it’s also possible to compost on-site. This lets you return nutrients to the soil, saving money on fertilizer and leaf disposal.

In a properly managed pile, most hazardous chemicals including juglone and oxalic acid will decompose in 4-6 weeks. At this point, the compost can be safely used anywhere. The exception is urushiol, the oil in poison ivy. It can take months to decompose, and it leaves a residue on bins and tools. Parts of this plant must be kept separate from your leaf pile when you make compost.

Roots and seeds can survive the composting process. This isn’t a concern if you’re only dealing with leaves. If you’re doing other landscaping on the property, you may end up mixing parts of unwanted plants into the pile. When you spread the compost, you’ll also spread unwanted seeds across your lawn.

Composting leaves is easy. Traditional composting requires some additions to balance out nutrients. Leaves are low in nitrogen, so they need to be mixed with them with high nitrogen material like grass. However, leaves can compost by themselves thanks to leaf mold. A variety of fungi are already present on fallen leaves and just need a boost to break down the pile. The leaves need to be shredded, and the pile needs to be thoroughly moistened. Mixing partially decomposed leaves will speed up the process. If you already used a vacuum or loader to collect the leaves, the resulting mulch just needs to be wetted down and covered.

For the best results, pile the leaves into a bin that’s at least three feet deep, wide and long. Alternatively, you can keep the leaves in a large plastic leaf bag. Cut a few small slits in the bag to let in air. Check the compost every month or so, stirring the pile and adding water as needed. The decomposition will keep the pile warm throughout the winter. By next spring or summer, the compost will be ready to use on your lawn.

Get Your Billy Goat Equipment Ready for the Fall Lawn Care Rush

If you have a vacuum, blower, debris loader or anything else from Billy Goat, you can get the parts and accessories you need for it from www.billygoatparts.com. Need engine or transmission parts? We’re a certified dealer for Billy Goat’s partners including Honda and Vanguard, which means we carry everything for your equipment. Best of all, we can ship your order to any address in the U.S. or Canada.

Posted in Uncategorized | Tagged , , , | Leave a comment

Restoring an Overgrown Lawn

Restoring an Overgrown LawnWhether it’s due to foreclosures, illness or legal problems, a short lapse in lawn care can turn a manicured lawn into an overgrown one. As a professional landscaper, restoring an overgrown lawn is one of the most difficult and satisfying jobs you can get. As a homeowner, it can be a formidable challenge that requires planning and work that goes beyond regular landscaping. Here’s how you can put your Billy Goat equipment to work, turning thick brush into a lawn you can be proud of.

Step 1: Brush Cutting

First, the bulk of the grass must be cut. The goal here isn’t to remove all of the grass. Instead, trim low enough that the grass blades can support their own weight. As with any mowing, the grass will need time to recover before the next trimming. Wait a week before regular mowing.

A Billy Goat Grazor will have no trouble cutting tall grass and saplings, but it also has another benefit: Even if you’re thorough in your debris removal, there will always be something hiding in the grass. You’re far less likely to damage a brush cutting blade on these obstacles than a regular mower blade, and the heavy-duty deck will help protect you when these objects are sent flying. However, these obstacles are still dangerous. Always wear eye protection, and make sure no one is within 20 feet of your Grazor during operation.

Step 2: Finish Mowing

With the grass height at a more manageable level, you can bring it back to a normal height. Take it slow: the lawn will be thicker than normal, putting added stress on your mower’s engine. It will also be chopping up the grass you trimmed while brush cutting.

Step 3: Dethatching

Tall grass will leave a thick layer of thatch that will choke short plants. Combine this with the layers of mulch left by brush cutting and mowing, and you have a major threat to your lawn.

After using the dethatcher, make a pass across the lawn with a vacuum. This will remove and chop up the thatch and clippings, making it ideal for mulch. This mulch can be applied to the lawn, later on, to return nutrients to the soil. Dispose of clippings if you have weeds germinating. Otherwise, you’ll spread their seeds when you use the mulch on your lawn.

Step 4: Correcting Drainage Issues

Heavy plant growth can lead to uneven surfaces. Use landscaping sand to fill in hollows and dips, but don’t add so much that it covers the grass.

Usually, overgrown lawns will have loose soil. However, if the grass was left to grow after construction, there may be compaction issues. If this is the case, use an aerator to break up the soil.

Step 5: Treat for Weeds and Pests

Once the lawn has recovered from dethatching and aerating, you can turn your attention to weeds, insects and other pests. To minimize impact, use spot application chemicals to attack unwanted plants directly. Grubs are common in overgrown lawns and should be treated with an insecticide.

Step 6: Reseed

The lawn should be safe for new grass four to six weeks after herbicide application. Establishing new grass will increase density, pushing out weeds and improving the look of the lawn.

When to Lay Down Sod

It may make sense to cut the topsoil out entirely and lay down new sod. There are three reasons why you should consider this option:

– Following all the steps to re-establish a lawn will take weeks. It may take another year before it really looks good. Laying sod will be faster.
– Areas covered in bushes and saplings require major soil work, requiring the wholesale re-establishment of grass.
– Severely uneven lawns need to be filled with dirt, covering the grass.

Your Billy Goat sod cutter will have no trouble slicing the soil, but you still need to trim down plants and grass before soil removal. Tall plants can push up on the machine, keeping it from cutting at an even depth.

If it’s Billy Goat, We Can Help You Keep it Running

Billygoatparts.com is more than just a Billy Goat dealer. We’re an authorized dealer for every one of their manufacturing partners including Honda, Briggs & Stratton, Tuff-Torq and Vanguard. That means you can order any part you need for your equipment from one place. Our site has sections of commonly needed parts, or you can search for parts based on your model. We ship across the United States and Canada.

Posted in Uncategorized | Tagged , , | Leave a comment

Preparing Your Lawn for Winter

Preparing Your Lawn for WinterThe growing season is winding down, but that doesn’t mean the end of lawn care. You still need to manage growth and drainage to give your grass a fighting chance at surviving the winter. These tips will help your lawn survive cold, frost and snow to come stronger than ever next spring.

Address Drainage Issues

Compacted soil will let snow melt pool on the surface, promoting snow mold and creating mud that can pull apart root systems.

Aerating should be part of your fall lawn care routine. It doesn’t matter if you use core or solid tines with your aerator as long as the dirt gets redistributed. From there, you can identify and fix problems before they lead to snow mold and other issues in the winter.

Heavy clay soil requires extra care to build up drainage spaces. Working sand, limestone, gypsum and organic material into the soil can help, as can growing plants that thrive in clay. However, don’t expect these solutions to work overnight. It can take years of work for the topsoil to develop the channels needed for drainage.

Your front lawn should slope gently from the house down to the street and be uniform. Fill in any depressions with a mix of soil and compost. If you need to fill in more than a couple inches, use a sod cutter to remove the top layer, add the top dressing, then replace the sod.

Severe drainage issues may require French drains and yard drains. Both drain types can channel water into the sewer system. If you live in an area with high precipitation, like a former swamp or the temperate rain forest of the Pacific Northwest, add some water-loving plants. These will either absorb the water or keep growing when partially submerged.

Fertilizing

If your lawn has cool-season grasses, the best time to fertilize is in the fall. Depending on where you live, the best time to fertilize will be in October or November. Applying fertilizer takes advantage of the grass’s shift from leaf to root production. This boosts sugar storage, helping the grass last through the winter. When spring comes, the grass will grow early, pushing out weeds. “Winterizer” blends have added nitrogen for better root performance.

If you live in a climate with mild winters, your grass may stay green all year long. Fall fertilizing will help the grass keep growing through the winter.

Keep Your Lawn Leaf Free

A layer of leaves encourages mold growth, traps moisture and blocks sunlight. Finely chopped leaves can be mulched and reused as fertilizer. If you’re using a Billy Goat vacuum, the impeller blades do this for you.

If you have a large area to clear, a wheeled or stand-on blower will do the job faster than a vacuum. The leaves will still be in one piece, but there are a couple ways you can deal with them:

Billy Goat’s truck loaders do the same shredding as their vacuums, so you’ll end up with compact piles of leaves ready for composting or disposal.

Whole leaves can be turned into fertilizer, but it will take longer. The process is faster if they’re wet and have signs of leaf mold. At this point, they’re already partially decomposed.

Covering Plants

Healthy plants don’t need much protection aside from their root system. Apply a 3-4 inch layer of mulch around perennials and the roots of cold-sensitive trees. This shields them from frost and delays ground freezing.

If you need to protect plants from freezing temporarily, cover them in burlap or polypropylene. Regular plastic, like a trash bag, will work in an emergency. If left on for too long, water can condense on the inside, freezing the plant.

Mowing Height

Once your grass is established from fall overseeding, start lowering your deck height. Your final mowing height should be as little as ½ inch. Make sure the blades are high enough that they aren’t slicing into crowns.

Check Your Lawn for Hidden Obstacles

A hidden chain or nail can turn into a projectile if picked up by a snowblower. Clearing the lawn of these obstacles now will make snow clearing safer this winter.

Need Something for Your Billy Goat Equipment?

Whether you live in the United States or Canada, you can get everything for your Billy Goat from www.billygoatparts.com. We’re an authorized dealer for Billy Goat and their manufacturing partners including Briggs & Stratton and Honda Engines. That means you can get replacements for every part of your equipment as well as accessories from one place. Ordering is easy: check out our popular parts sections, or do a search for your equipment model. Our search engine breaks down parts into systems, complete with factory diagrams and descriptions. This makes it easy to find exactly what you need and be certain what you’re ordering will fit.

Posted in Uncategorized | Tagged , , | Leave a comment

Troubleshooting Brushcutters

BC2600 Hydro Series BrushcuttersAre you having trouble with your Billy Goat Outback brush cutter? Whether you have a BC26 with a floating deck, fixed deck or front casters, it’s easy to narrow down the issue. Here’s what you need to
know to identify and fix common problems with these machines.

Before You Begin

Always disconnect the spark plug before working on your brush cutter. If you bump the drive wheels or blade while the clutch is engaged, you might turn over the engine, causing it to start.

If you remove the blade nut, it must be replaced with a new one. When installing the nut, torque it to 40 ft-lbs.

Engine Doesn’t Start

– Check the throttle. It needs to be in the “Fast” position for the engine to start.
– If you have a Honda engine, check the choke. If the engine is cold, pull the knob out to close the choke. If the engine was just running, push the choke in.
– Check the gas tank. Add fuel if the tank is empty. If the fuel is over one month old, or it was treated with a stabilizer and is over three months old, it’s stale. This makes it hard to ignite. Drain the tank and add fresh fuel.
– Honda engines come with Oil Alert. This shuts off the ignition if the oil level is low. Check the oil level and add oil as needed.
– Make sure the spark plug wire is connected to the plug.
– Check the air filter. A clogged filter can keep the engine from getting the air it needs to run. Paper filter elements can be cleaned by tapping them against a hard surface. Honda foam elements should be washed, dried and soaked in clean engine oil. Squeeze out the filter before installing. Briggs & Stratton foam elements can be washed, but should not be oiled.

Poor Cutting Performance

– Remove any clogs in the deck and debris buildup around the blade.
– Increase the engine speed. If the engine is warm, make sure the choke is open.
– If the blade drive cable is loose, it won’t engage the clutch. Use the cable adjuster to reduce the cable slack.
– The blade is dull. Sharpened or replace it. Always use a new nut when putting a new or sharpened blade on the spindle.

Smoke Coming from Belt, or Belt is Slipping

– The belt isn’t under enough tension. Make sure the clutch lever is fully engaged, and check the cable tension.
– The belt has stretched from wear and needs to be replaced.
– One of the pulleys is worn out or damaged, and needs to be replaced.

Clutch Slips or Makes Squealing Sounds

– The clutch will slip when wet. When cleaning, do not spray water directly at the blade clutch. If the clutch does get wet, wipe it down and let it dry out before using your brush cutter.
– Increase the clutch cable tension to get the clutch to engage fully.
– The clutch is worn out and needs to be replaced.

Blade Brake Won’t Engage

– Loosen the clutch cable. It should have some slack when not engaged. The cable spring should stretch ¼ to 3/8 of an inch with the lever closed.
– The brake clutch is worn and needs to be replaced.

Transaxle Won’t Engage (Self-Propelled Models)

– Adjust the clutch cable using the adjuster next to the handle to remove some slack.
– The clutch cable has stretched and needs to be replaced.
– The drive belt is stretched or worn out. Replace it.

Transaxle Won’t Disengage

– Loosen the clutch cable using the adjuster next to the handle. It should have some slack when not engaged.

Engine Won’t Turn Over

– The blade clutch is seized, forcing the blade to be turned with the engine. Replace the clutch.
– The engine needs to be diagnosed by a professional mechanic.

Abnormal Vibrations Are Coming from the Brushcutter

– The blade is loose or out of balance. Check the nut tightness, and rebalance the blade. Use a new nut when putting the blade back on the brush cutter.
– The engine mounting bolts are loose and need to be tightened down.
– The blade belt is worn out and needs to be replaced.

Get the Parts You Need Straight from Your Browser

If you need equipment or engine parts for your Billy Goat, visit www.billygoatparts.com. We’re an authorized dealer for Billy Goat, Tuff Torq, and Honda Engines, so you can get everything you need from one place. Our site can narrow down your search to your model and show you factory parts diagrams, so you know exactly what you’re ordering. We ship across the United States and Canada.

Posted in Uncategorized | Tagged , , | Leave a comment

Cleaning and Sealing Concrete

Cleaning and Sealing ConcreteIf you own any Billy Goat equipment, at least some of it can be used to clean and seal concrete: walk-behind and riding leaf blowers, the Grazor crack cleaner, and even pressure washers. How? This step-by-step guide will take you through the process so your driveway will survive another winter.

When Should I Seal My Driveway?

Your goal should be to have the sealant fully cured before the first freeze. Here’s how much time it takes for each step of the process.

Cleaning cracks and washing: One day
Applying liquid crack filler to small cracks: One day
Applying driveway patch to large cracks: Four to six weeks
Sealing: 5 days

If your driveway doesn’t have major damage, the entire job can be done in about a week.

Cleaning Cracks

Inspect the cracks and remove any rocks or solid objects. These can be picked up and thrown by the crack cleaner’s brush.

Don’t use a lawn edger to clean out pavement cracks. Repeated strikes against the pavement will damage your equipment. Billy Goat’s Grazor has a wire brush wheel and a shock absorber designed to handle these impacts.

Start by sweeping the brush side-to-side to remove grass and weeds. This makes it easier to see the edges of the cracks. Once the surface is clear, move the brush back and forth over the crack to lift out dirt. Use light pressure to push out dirt in thin layers. This is safer and easier on the brush than lowering the wheel and trying to remove the dirt all at once. The Grazor can sweep at a rate of up to 20 feet per minute, so it takes very little time to clean a driveway, even with several passes.

Filling Cracks

Use a crack filler to fill in cracks under ½ inch in width. This liquid patch is self-leveling, so you just have to pour in enough to reach the top surface of the pavement. Most liquid patch formulas are fully cured within 8 hours.

For cracks over a ½ inch wide, use driveway patch. Once you fill in the crack, use a shovel to tamper the patch, then level it with a scraper. Keep in mind it can take up to 6 weeks before the patch fully cures.

Rinsing

While you can clean your driveway before filling in cracks, you will still need to give the entire surface a thorough clean before applying sealant.

To remove surface dirt and mold, use your pressure washer with a 25-degree (green) nozzle. Narrower nozzles can erode concrete. As with any surface, you should keep the end of the wand at least 12 inches from the surface. Spraying at a slight angle will help push dirt away from the area being cleaned.

Removing Stains

After removing surface dirt, apply a detergent to lift stains and ground-in dirt. While all-purpose pressure washer detergents will work, concrete and driveway formulas are better at removing oil stains.

In most areas, the storm drains go directly to waterways. Make sure the detergent you choose is biodegradable to protect the environment and comply with local water pollution laws.

Use the soap (black) nozzle to apply the detergent. If your driveway is on a hill, work from the bottom up to prevent streaking. Check the detergent instructions for dwell time: most formulas need to sit for 5-15 minutes to work, but they can stain concrete if left to dry. Use a scrub brush to lift tough stains, then switch back to the green nozzle to wash off the detergent.

Applying Sealant

Once the cement is dry, you can apply the sealant. Use a brush or leaf blower to push away any leaves or dirt that have collected on your driveway between washing and application.

Work from the top of the driveway down. Pour a line of sealant across the driveway directly from the bucket. Make several passes with a squeegee at a 45-degree angle to spread the sealant out in an even coat. Use a paintbrush to apply sealant to the edges of the driveway.

After 24 hours, you can apply a second coat to fill in any thin or bare areas. Wait another 24 hours before walking on the pavement, and 72 hours before driving on it.

We Have Everything You Need for Your Billy Goat

Billygoatparts.com is an authorized dealer for Billy Goat and their partners including Honda, Briggs & Stratton and CAT Pumps. That means we carry everything you need for your Billy Goat equipment. Our site has sections for common replacement parts, and our search engine can narrow down parts to your specific model. We even have parts diagrams and factory descriptions for every item, so you can be sure you’re buying exactly what you need. We ship across the U.S. and Canada.

Posted in Uncategorized | Tagged , , | Leave a comment