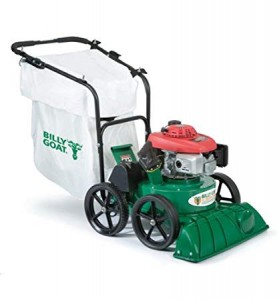
 The TKV650SPH chipper/shredder vacuum may be sized for residential lawn care, but it’s built to deliver the same reliability as Billy Goat’s commercial equipment. Here’s everything you need to know to keep this vacuum running from initial assembly to blade sharpening.
Assembly
1. Place washers on the two long bolts.
2. Slide the upper handle over the lower handle, lining up the holes in each section.
3. Slide the bolts through these holes from the inner sides of the handle.
4. Slide washers onto the bolts, then install the nuts.
5. Attach the throttle lever to the right side of the upper handle. Line up the holes in the bottom of the throttle with the holes in the handle. Install one of the short screws and washers on the front hole.
6. Attach the clutch cable to the right side of the handle. Insert a second short screw through the clutch cable mount and the rear hole on the throttle. Place a washer on the screw, then screw down a nut.
7. Connect the end of the clutch cable to the bail.
8. Attach the debris bag to the quick disconnect. Wrap the bag straps around the four posts on the upper handle.
9. Add oil and gas to the engine. Connect the spark plug.
Maintenance Schedule
Clean the debris bag before each use, or each day of use. Be sure to check the bag straps before starting the engine. Check for loose and damaged parts each day before use.
Impeller Removal and Belt Replacement
Always use a new impeller bolt and lock washer when reinstalling the impeller.
1. Drain the gas and oil from the engine.
2. Remove the bag and upper handle.
3. Remove the transmission cover, idler pulley, transmission and transmission belt.
4. Unscrew the bolts holding on the transmission plate and housing plate. Remove these plates.
5. Turn the engine and top plate upside down.
6. Unscrew the impeller bolt. Remove the bolt and lock washer.
7. Lift the impeller off of the drive shaft. If the impeller is stuck, apply penetrating oil and get a 3/4-16 bolt that is at least 3 inches long. Thread the bolt in by hand until it’s against the shaft. Tighten the bolt slowly to pull the impeller off of the shaft.
At this point, you can place a new belt on the driveshaft.
8. Reassemble in reverse order, torquing the impeller bolt to 33-38 ft-lbs. If you are installing a new belt, feed it through the hole in the top plate, making sure it goes over the transmission pulley and inside the two fingers on the belt plate.
Drive Chain Alignment and Replacement
1. Disconnect the spark plug.
2. Prop up the rear of the vacuum so that the rear wheels are off of the ground.
3. Remove the transmission cover and slide the belt off of the transmission.
Replacing the chain:
1. Remove the bolts on the side of the transmission that holds down the flange bearings. This will give the chain enough slack that it can slide off.
2. Remove the old chain and fit a new one in its place. Tighten down the flange bearing screws, then check the tension.
Adjusting chain tension:
1. Turn the wheels. They should move freely. If they don’t, loosen the bearings and push them until the chain runs in a straight line.
2. Tighten the flange screws and recheck the tension.
Reassemble in reverse order.
Belt Tension Adjustment
1. Disconnect the spark plug.
2. Remove the transmission cover.
3. Using a pair of ½ inch wrenches, loosen the two nuts connecting the clutch cable to the idler arm.
4. Turn the nuts to adjust the spring tension. The spring should be 1.5 inches long with the bail open, and 1.75 inches with the bail closed.
5. Tighten the nuts against each other and reinstall the transmission cover.
6. Operate the vacuum. The clutch should start to engage when the bail is 2 ½ inches from the handle. If it doesn’t engage correctly, recheck the spring tension.
Chipper Blade Sharpening and Replacement
1. Gain access to the impeller. See “Impeller Removal and Belt Replacement” above. You do not need to remove the impeller from the drive shaft.
2. Use a 3/16 inch hex wrench and a ½ inch open end wrench to remove the chipper blades.
3. Grind the cutting edge at 40 degrees to sharpen. Go slow to prevent overheating that can ruin the heat treating. Replace the blade if it no longer overhangs the chip relief hole, or if a damaged blade is causing vibrations.
Need Parts for Your Billy Goat Vacuum?
As an authorized dealer for Billy Goat and Honda Engines, www.billygoatparts.com is able to offer OEM replacements for everything on your TKV vacuum. Just select your model and serial number, and our site will show you factory parts information and diagrams specific to your machine. We can ship your order to any address in the U.S. or Canada.
