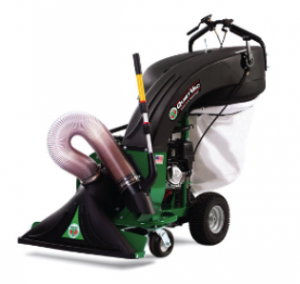
 With its cyclonic filtration, low noise and super fine dust sock, Billy Goat’s QV QuietVacs are perfect for clearing parking lots, sidewalks and new construction. These tips will help you set up your new contractor vacuum and keep it running at peak performance.
Setting Up Your New QV Vacuum
1. Remove the vacuum from the box, taking care not to snag the control cables.
2. Attach the handle by placing the bolt and large washer on the inside-facing part of the hood. Slide the handle onto the bolts with the bend facing forward, taking care not to get the cables tangled. Place the small washers on the bolts, and screw on the included lock nuts.
3. Attach the nozzle to the front of the machine using 6 serrated nuts.
4. Check the included engine manual for instructions on setting up the engine. Be sure to add oil: while there may be some residual oil left over from factory testing, the sump is drained before shipping.
5. Check the tire pressure. The correct pressure is listed on the sidewall.
Maintenance Schedule
Before use: Clean the debris bag and check the tire pressure.
Every 5 hours or every day: Check for loose or damaged parts and do a thorough inspection if the vacuum is exhibiting unusual vibrations.
Every 50 hours: Check the drive belt and add grease to the Zerk fittings. There are fittings on the wheels, casters and shaft bearings.
As needed: Clean the bag and dust sock.
Dust Sock Care
The dust sock should only be used in dry conditions. Moisture can damage the sock fabric and reduce its effectiveness.
To clean the sock, remove it from the bag and dump out any collected dust. Gently shake the sock, or spray it with compressed air, keeping the nozzle 6-12 inches away from the fabric. Never hit the bag or knock it against objects to knock dirt loose.
Impeller Removal and Belt Replacement
The impeller bolt and washer must be replaced with new parts each time the impeller is removed from the vacuum.
1. Disconnect the spark plug.
2. Chock the wheels to keep the vacuum from rolling.
3. Unbolt the nozzle from the nozzle plate, then unbolt the nozzle plate from the housing.
4. Remove the belt from the lower pulley, then push it off of the groove in the impeller hub. If you need more slack to move the belt, loosen the bearings holding the lower pulley in place.
5. Slide the belt off of the drive pulley.
6. Remove the impeller bolt and washer.
7. Slide the impeller off of the drive shaft and set it aside. If it won’t budge, apply some penetrating oil and hook a pair of crowbars between the impeller and the housing. Pry off the impeller.
If you need to replace the belt, loosen the set screws on the pulley at the end of the impeller drive shaft. Slide the pulley down the shaft until you can remove the belt. Slide the new belt onto this pulley, and tighten the set screws. Walk the belt onto the bottom pulley.
8. Using a new bolt and washer, install the impeller. Make sure the belt is seated in pulley built into the hub.
9. Align the lower pulley with the impeller so that the belt is running straight. Tighten down the set screws. Make sure the key is in place at the bottom of the pulley.
10. Bolt the nozzle plate and nozzle plate onto the front of the machine, then reconnect the spark plug wire.
Drive Cable Adjustment
The cable may need to be adjusted if the drive system won’t engage or it doesn’t disengage cleanly when the drive levers are released.
1. Disconnect the spark plug.
2. Remove the bag, then unbolt the transmission cover.
3. Squeeze and release the drive levers, watching the arms on the back of the transmission. The arms should fully engage when the levers are held down, then return to their starting position when they’re released.
4. If the arms aren’t moving like they should, loosen the pair of nuts on the cable barrel next to the drive levers. Moving the barrel up decreases cable tension, while moving the barrel down increases tension.
5. Recheck the arm movement. Once the cables are adjusted, reinstall the transmission cover, reattach the dust bag and reconnect the spark plug.
Get Everything You Need for Your Vacuum
Billygoatparts.com isn’t just a Billy Goat dealer, we’re also a certified dealer for Honda Engines and Briggs & Stratton, which means we have all the parts and accessories you need for your hard surface vacuum. Need help finding the right part? Our search engine can find parts based on your model and serial number, and even has diagrams and descriptions direct from the manufacturers, making it easy to match up what you need with what you’re ordering. We ship across the U.S. and Canada.
