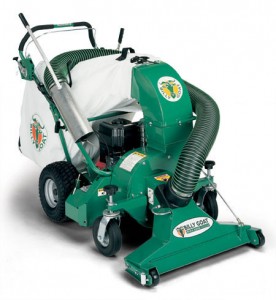
A lawn vacuum can make quick work of leaf cleanup on lawns, but it can also be handy for cleaning out landscape features, fences and bushes by using a hose attachment. Billy Goat includes a hose with KV, MV and QV vacuums, but you can also add one to your LB or TKV vacuum using their kit. Here’s what you need to do to install it.
Before You Begin
Disconnect the spark plug to prevent an accidental start, and chock the wheels to keep the vacuum from rolling.
You will need three tools needed to install this kit:
— A 5/16 inch nut driver or socket and ratchet
— Two 7/16 inch wrenches
Make sure your kit includes the following:
— A hose with a handle and metal nozzle attached to one end
— Two hose clamps
— A plastic coupler
— A hose holder
— A blocking plate
— A hose nozzle bracket
This kit may seem light on fasteners, but that’s because it’s designed to reuse hardware already installed on your vacuum.
Installing the Nozzle Wear Guards
Raise the nozzle to its highest position.
The left and right sides of the nozzle each have a pair of bolts, nuts, and washers holding on the reinforcement bracket. Remove these parts.
Push the included wear guards into place on the sides of the nozzle with the bolt holes going inside the nozzle lip. Reinstall the bolts, nuts, and washers.
Installing the Hose Nozzle Bracket
The bracket is universal, but its position will vary depending on your model and engine. Billy Goat builds the top of the vacuum with two extra long screws designed to clamp down on the deck while holding the bracket. These screws are always on the muffler side of the engine. Here’s where you’ll find them.
All TKV vacuums: One screw is directly to the left of the engine, while the other is behind and to the left of the engine.
Honda: One screw is directly to the left of the engine, while the second screw is behind the first screw.
Briggs & Stratton: One screw is directly to the right of the engine, while the other is behind and to the right of the engine.
To install, remove these screws, set the bracket over the holes, and put the screws back into the vacuum.
Installing the Hose Holder
The ends of this bracket fit into a pair of holes mid-way up the handle. Insert one side of the bracket into one of the holes, then pull the bracket over until the other end slides into the handle. The top edge of the bracket should face away from the bag.
Installing the Hose
Slide the two hose clamps onto the end of the hose. Slide the hose over the side of the coupler that doesn’t have any pins. Tighten down the hose clamps over the hose and coupler using the nut driver.
Remove the screw on the top of the hose opening plug, located on the front of the vacuum nozzle. Slide off the plug. Slide the coupler into the hose opening at an angle, lining up the outer pin with the slot. Once the front of the coupler is in, rotate it to line up the second pin with the slot and push it in. Once the coupler sits flush with the opening, it’s secure.
Wrapping the Hose
Run the hose around the intake side of the engine and over the hose holder. Slide the metal nozzle onto the hose nozzle bracket. If everything is in the right place, the hose should not come in contact with the exhaust, which can melt the hose liner.
Using the Blocker Plate
This plate slides into the slots on the nozzle wear guards, blocking the vacuum inlet. This redirects air through the hose. Never install or remove this plate with the engine on. The plate can be snapped onto the hose holding bar when not in use.
Get Everything You Need for Your Billy Goat Straight From Your Browser
Billygoatparts.com is a certified Billy Goat dealer, so we carry the OEM parts and accessories you need for your equipment including hose kits for their vacuums. Browse our accessories section to find what you need, or use our search engine to find parts and accessories designed to fit your specific model. We can ship your order anywhere in the U.S. or Canada.

