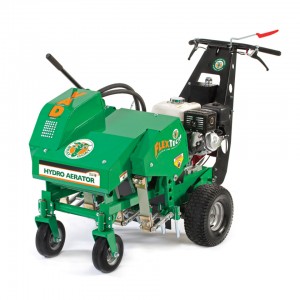
 The AE1300H PLUGR’s hydrostatic drive may make it seem complex, but this aerator is easy to care for. Here’s what you need to get your new aerator up and running as well as maintaining the tines and drive system.
Assembly
The AE1300H come fully assembled from the factory, but there are a couple of things that need to be done before it will be ready to use:
– Add oil to the engine.
– Connect the spark plug wire.
– Turn on the ignition switch on the engine. The aerator has a separate start/stop switch on the controls that should be used from now on.
Maintenance
Daily: Check the oil level, inspect the machine for loose or damaged parts and clean off any debris. Keeping the tines clean will help them last longer.
Every 10 hours: Change the engine oil and lubricate the aerator’s cables and linkages.
Every 25 hours: Check hydraulic oil level and front casters.
Every 50 hours: Check tire pressure and belt wear.
Hydraulic System
Let the aerator cool down before servicing this system and disconnect the spark plug wire to prevent accidental starts. Hydraulic fluid can spray out at high pressure, injecting itself into your body and causing serious injury. When testing for leaks, place a piece of paper in the path of the spray instead of using your hand.
To check the fluid level, remove the breather cap from the oil tank. The oil should come up to the bottom of the strainer in the filler neck. Billy Goat recommends using 20W50 motor oil for most operating temperatures. 15W40 or 10W40 synthetic can be used in colder climates.
To change the filter, first clamp down the hose between the tank and filter to keep it from flinging out and spilling hydraulic oil. Unscrew the filter. Apply a thin layer of fresh oil to the gasket on the new filter and attach it to the hose. Once the filter seats, turn it another 2/3 turn to get a tight seal.
Tine Replacement
Billy Goat recommends replacing tines in pairs on the tine arm to keep wear and cutting force even.
1. Remove the 3/8 inch bolt that passes through the tine assembly. Slide the tines out of the tine arm.
2. Inspect the bolt for wear, bending and other damage. Replace the bolt with a Grade 8 fastener if any damage is found.
3. Place a washer on the tine holder. Slide the tine onto the bolt. Slide the bolt onto the tine arm with the open ends facing the rear of the machine. Slide a second tine onto the bolt facing the same direction, followed by a tine holder, washer and nylock nut. Tighten the nut and bolt.
Belt Tension and Replacement
The belt can be accessed by removing the belt cover on the side of the machine. It’s held on by four screws.
When the drive bail is closed, the length of the coiled part of the clutch cable spring should be 1 ¾ inches. Here’s how to adjust the cable:
1. Disconnect the spark plug to prevent an accidental start.
2. Loosen the jam nuts holding the cable onto the handle. Move the clutch cable, retighten the nuts and test the bail.
3. Once the clutch spring stretches the right distance, test the cable by reconnecting the spark plug and running the machine. The hydraulic pump and transaxle should fully disengage with the bail open and engage with no sign of belt slippage when the bail is engaged.
If the belt is cracked, the edges are worn or it has stretched too far to get the right tension, it should be replaced. Simply slide the old belt off of the pulleys and slide the new belt into its place.
Chain Tension and Lubrication
To access the chains, remove the hood. It’s held on by 7 bolts, washers and lock washers around its perimeter. The chains should be lubricated with SAE 30 non-detergent motor oil or chain lubricant. The chains should be lubricated immediately if the aerator was cleaned with a pressure washer.
The AE1300 has two drive chains, one on each side of the tine reel. When properly tensioned, these chains should have 3/8 to ½ inch of slack. Do the following to adjust the tension:
1. Locate the bolt and nut that holds each idler sprocket in place on the inner sides of the machine.
2. Loosen the bolt. Move the sprocket up to increase tension and down to decrease tension.
3. Once the tension is correct, reinstall the hood.
Get Everything You Need for Your Billy Goat
Billygoatparts.com is an authorized dealer for Billy Goat and their manufacturing partners including Honda Engines. This lets us ship anything you need for your aerator straight to your door whether you live in the U.S. or Canada. Need help finding the right part? Our search engine can show you factory diagrams and descriptions specific to your model, taking the guesswork out of ordering.
