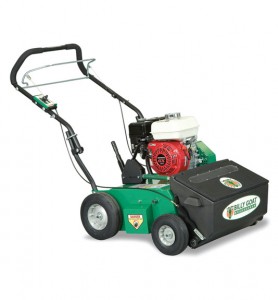
 Billy Goat Parts has the parts you need to get your Billy Goat Overseeder back in service, and most of the repairs that you may need to do can be accomplished using common hand tools.
Before You Begin
Disconnect the spark plug and drain the fuel from the engine. Always wear safety glasses: these repairs involve untensioning belts and springs which can quickly turn them into projectiles.
Replace the Mule Drive Belt
1. Remove the reel engagement spring. Clip a pair of vice grips to the spring, then place a piece of pipe over the handle. Push the pipe against the rear wheel for leverage to move the spring out of the hole. Remove the vice grips.
2. Using a flat-head screwdriver, remove the e-clip holding on the rear wheel. Slide off the washer, then remove the wheel.
3. With a partner, gently turn the overseeder on its side. The rear wheel can be placed under the overseeder to keep it balanced.
4. Remove the belt guard. There are three bolts holding it on, but only the two rear bolts need to be fully extracted.
5. Unbolt and remove any hardware surrounding the front pulley. Take out the key and slide the pulley off the shaft.
6. Remove the fasteners holding the mule drive assembly and slide it out of the overseeder, taking care to move the belt away from the transaxle pulley.
7. Loosen the idler arm so that the keeper can be moved away from the rest of the mule drive assembly. Take off the belt.
8. Place the new belt onto the assembly and follow the previous steps in reverse to reassemble. Make sure the belt is properly seated on the transaxle pulley and adjust the keepers on the mule drive and front pulley to allow enough space for the belt to move freely.
Replacing the Main Drive Belt
1. Remove the crank belt guard. It is held on by three screws.
2. Remove the reel belt guard. It is held on by two bolts.
3. Remove the jackshaft pulley, but don’t take the belt off of it.
4. Remove the carriage bolts holding the flange bearing onto the intermediate shaft, and then remove the bearing.
5. Disconnect the idler spring. It is next to the bolt on the driveshaft pulley.
6. Remove the limiter bolt from the idler arm.
7. Roll the belt off the engine pulley. Slide the belt off the jackshaft and through the hole left by the flange bearing.
8. Using the new belt, follow the previous steps in reverse to reassemble.
Reel Belt Replacement
1. Remove the reel belt drive guard. It is held on by two screws.
2. Loosen the belt guards and slide them out of the way.
3. Slide the belts off of the pulleys.
4. Place the new belts on the pulleys. Adjust and retighten the belt guards so that they are 1/8″ away from the belts when the clutching pulley is engaged.
5. Reinstall the reel belt drive guard.
Replace the Reel Assembly
1. Remove the reel belt drive guard. It is held on by two screws.
2. Loosen the belt guards and slide them out of the way.
3. Slide the belts off of the pulleys.
4. Remove the lower pulley of the reel assembly.
5. Unbolt the hardware holding the flange bearings of the reel assembly.
6. Lower the reel assembly out of the machine.
7. Slide the new assembly in place. Follow the previous steps in reverse order.
Replace the Verti-Cut Blades
1. Follow steps 1-4 of Reel Assembly Replacement to remove the assembly from the overseeder.
2. Holding the assembly firmly, loosen the bolt on the assembly end.
3. Slide the blades and spacers off the assembly shaft.
4. Put the assembly back together with the new blades. Each blade should be rotated 45 degrees relative to the previously installed blade: the orientation hole on the blade above the shaft opening should be slightly to the right of the hole of the previous blade.
5. Torque the end nut to 120 ft-lbs. Overtightening can lead to vibration.
6. Follow steps 1-4 of Reel Assembly Replacement in reverse to reinstall the assembly.
Replace the Reel Clutch and Auto Drop Cables
1. Cut off any tie wraps securing the cable.
2. Remove the two cable springs from the clutch/auto handle.
3. Remove the reel drive belt guard. It is held on by two screws.
4. Remove the clevis pin from the clutch idler arm. Remove the nuts holding the cable barrel onto the clutch cable bracket, located on the side of the engine base.
5. Remove the clevis pin from the auto drop bracket at the front of the seed box.
6. Remove the routing clamp holding the auto drop cable located at the side of the seed box.
7. Loosen the bolt holding the cable assembly to the console and remove the assembly from the overseeder.
8. Follow the previous steps in reverse order to install the new cables.
Billy Goat Parts has all of the OEM replacement parts mentioned above, readily available. In addition to this, they also have experts available to assist you with any questions about Billy Goat Overseeder maintenance. Use the online parts search tool to easily identify and order the part that you need to complete your maintenance procedure.
